Determination of the inner-surface profile of a capsule using chromatic confocal spectroscopy
-
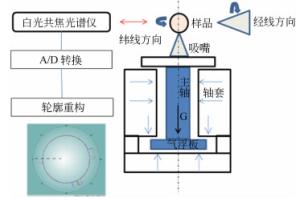
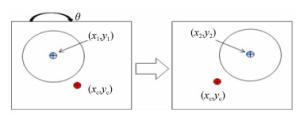
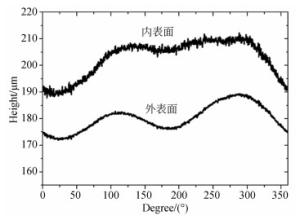
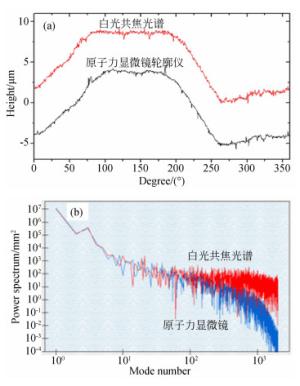
摘要: 靶丸内表面轮廓是激光核聚变靶丸的关键参数,需要精密检测。本文首先分析了基于白光共焦光谱和精密气浮轴系的靶丸内表面轮廓测量基本原理,建立了靶丸内表面轮廓的白光共焦光谱测量方法。此外,搭建了靶丸内表面轮廓测量实验装置,建立了基于靶丸光学图像的辅助调心方法,实现了靶丸内表面轮廓的精密测量,获得了准确的靶丸内表面轮廓曲线;最后,对测量结果的可靠性进行了实验验证和不确定度分析,结果表明,白光共焦光谱能实现靶丸内表面低阶轮廓的精密测量,其测量不确定度优于0.1 μm。Abstract: The inner surface profile of capsule, which is one of the essential parameters of laser nuclear fusion capsule, needs to be measured precisely. In this paper, the basic measurement principle of the capsule's inner surface profile, which is based on the white light confocal spectrum and precision air flotation bearing, is analyzed firstly and the corresponding measuring method is presented.Then, the experimental apparatus applied to measure the inner surface profile of capsule is developed, and an auxiliary aligning method based on optical image is proposed. The precise measurement of the inner surface profile of capsule is achieved and the accurate inner surface profile curve of capsule is obtained. Finally, the reliability of measured data is verified experimentally and the measuring uncertainty is analyzed. The experimental results illustrate that the inner surface profile of capsule can be measured accurately using white light confocal spectrum and the measuring uncertainty is less than 0.1 μm.
-
Key words:
- chromatic confocal spectrum /
- inner surface profile /
- capsule /
- laser fusion
-
表 1 测量不确定度分量表
Table 1. Components of measurement uncertainty
不确定度分量 不确定度来源 不确定度大小/nm u1 直接测量误差 39 u2 轴系的回转误差 44 u3 重复性测量误差 41 u4 校准模型误差 52 -
[1] LINDL J D, AMENDT P, BERGER R L, et al.. The physics basis for ignition using indirect-drive targets on the National Ignition Facility[J]. Physics of Plasmas, 2004, 11(2):339-491. doi: 10.1063/1.1578638 [2] HAAN S W, LINDL J D, CALLAHAN D A, et al.. Point design targets, specifications, and requirements for the 2010 ignition campaign on the National Ignition Facility[J]. Physics of Plasmas, 2011, 18(5):051001. doi: 10.1063/1.3592169 [3] MCEACHERN R L, MOORE C E, WALLACE R J. The design, performance, and application of an atomic force microscope-based profilometer[J]. Journal of Vacuum Science & Technology A, 1995, 13(3):983-989. doi: 10.1116-1.579662/ [4] STEPHENS R B, OLSON D, HUANG H, et al.. Complete surface mapping of ICF shells[J]. Fusion Science and Technology, 2004, 45(2):210-213. doi: 10.13182/FST45-210 [5] 赵学森, 孙涛, 马小军, 等.基于AFM的靶丸表面轮廓仪设计及其测量精度分析[J].纳米技术与精密工程, 2006, 4(4):307-310. doi: 10.3969/j.issn.1672-6030.2006.04.012ZHAO X S, SUN T, MA X J, et al.. Design of target profilometer based on AFM and its measure precision analysis[J]. Nanotechnology and Precision Engineering, 2006, 4(4):307-310. (in Chinese) doi: 10.3969/j.issn.1672-6030.2006.04.012 [6] 赵学森, 高党忠, 马小军, 等.立式靶丸AFM表面轮廓仪系统精度测试[J].原子能科学技术, 2012, 46(8):1014-1018. http://d.old.wanfangdata.com.cn/Periodical/yznkxjs201208024ZHAO X S, GAO D ZH, MA X J, et al.. Measure precision analysis of capsule vertical-AFM surface profiler system[J]. Atomic Energy Science and Technology, 2012, 46(8):1014-1018. (in Chinese) http://d.old.wanfangdata.com.cn/Periodical/yznkxjs201208024 [7] HUANG H, KOZIOZIEMSKI B J, STEPHENS R B, et al.. Quantitative radiography:Submicron dimension calibration for ICF ablator shell characterization[J]. Fusion Science and Technology, 2007, 51(4):519-524. doi: 10.13182/FST07-3 [8] DONG B, ZHANG Y, ZHANG W C, et al.. Highly sensitive, wide dynamic range displacement sensor combining chromatic confocal system and phase-sensitive spectral optical coherence tomography[J]. Optics Express, 2017, 25(5):5426-5430. doi: 10.1364/OE.25.005426 [9] BOETTCHER T, GRONLE M, OSTEN W. Multi-layer topography measurement using a new hybrid single-shot technique:Chromatic Confocal Coherence Tomography (CCCT)[J]. Optics Express, 2017, 25(9):10204-10213. doi: 10.1364/OE.25.010204 [10] SEPPÄ J, NIEMELÄ K, LASSILA A. Metrological characterization methods for confocal chromatic line sensors and optical topography sensors[J]. Measurement Science and Technology, 2018, 29(5):054008. doi: 10.1088/1361-6501/aaad2b [11] ZOU X C, ZHAO X S, LI G, et al.. Non-contact on-machine measurement using a chromatic confocal probe for an ultra-precision turning machine[J]. The International Journal of Advanced Manufacturing Technology, 2017, 90(5-8):2163-2172. doi: 10.1007/s00170-016-9494-3 [12] 刘志群, 易定容, 孔令华, 等.基于并行共聚焦显微系统的物方差动轴向测量[J].光学 精密工程, 2017, 25(6):1449-1457. http://d.old.wanfangdata.com.cn/Periodical/gxjmgc201706007LIU ZH Q, YI D R, KONG L H, et al.. Object-side based differential axial measurement based on parallel confocal microscopy[J]. Opt. Precision Eng., 2017, 25(6):1449-1457. (in Chinese) http://d.old.wanfangdata.com.cn/Periodical/gxjmgc201706007 [13] 戴岑, 巩岩, 张昊, 等.微分干涉差共焦显微膜层微结构缺陷探测系统[J].中国光学, 2018, 11(2):255-264. doi: 10.3788/CO.20181102.0255DAI C, GONG Y, ZHANG H, et al.. Detection system of multilayer coating microstructure defects based on differential interference contrast confocal microscopy[J]. Chinese Optics, 2018, 11(2):255-264. (in Chinese) doi: 10.3788/CO.20181102.0255 [14] KUNKEL M, SCHULZE J. Noncontact measurement of central lens thickness[J]. Glass Science and Technology, 2005, 78(5):245-247. http://www.wanfangdata.com.cn/details/detail.do?_type=perio&id=b172689671d297ad58601608ff1a6d3e [15] 马小军, 高党忠, 杨蒙生, 等.应用白光共焦光谱测量金属薄膜厚度[J].光学 精密工程, 2011, 19(1):17-22. http://d.old.wanfangdata.com.cn/Periodical/gxjmgc201101003MA X J, GAO D ZH, YANG M SH, et al.. Measurement of thickness of metal thin film by using chromatic confocal spectral technology[J]. Opt. Precision Eng., 2011, 19(1):17-22. (in Chinese) http://d.old.wanfangdata.com.cn/Periodical/gxjmgc201101003 -


 下载:
下载:


