2023 Vol. 16, No. 4
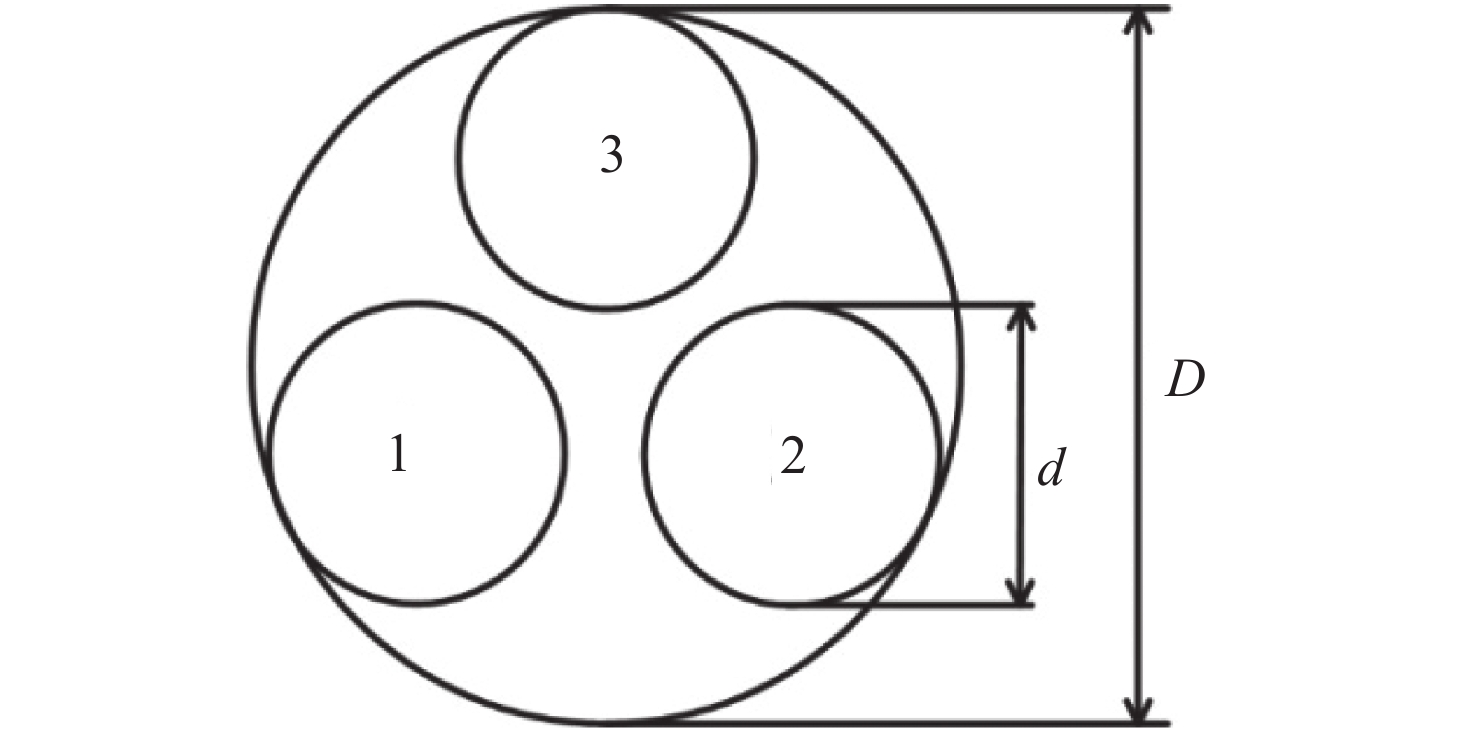
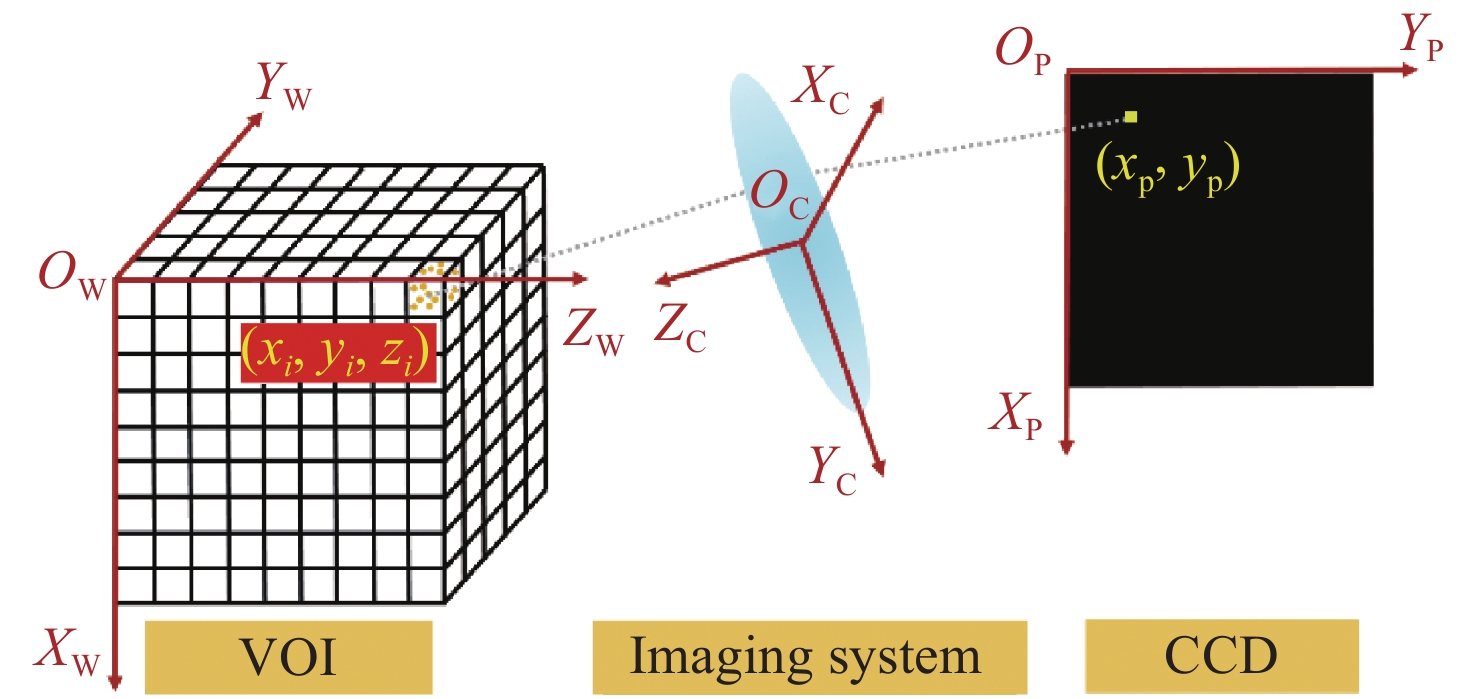
In order to accurately measure the laser intensity distribution, we propose a method based on tomographic imaging. Firstly, numerical studies were performed to validate the correctness of the imaging model and convergence of the reconstruction algorithm. Reconstruction errors were less than or equal to 7.02% with different laser intensity distribution phantoms employed and less than 8.5% with the addition of different random noise levels under 10%. Additionally, a demonstration experiment was performed with the employment of a customized fiber bundle to realize the measurement from seven views. Seven views are distributed along a semi-circle plane which is perpendicular to the propagation direction of the laser beam. The distance from the laser beam to each view is nearly 160 mm and the angle coverage range of the seven views is about 150°. Laser-induced fluorescence obtained after the laser passed through a rhodamine-ethanol solution was collected by the tomographic imaging system. Then, the laser intensity distribution was obtained through absorption-corrected three-dimensional (3D) reconstruction. The correlation of the projection and re-projection of the one view was used to quantitatively access the accuracy after the other six views were adopted in the reconstruction. The results show the feasibility of the method with a correlation coefficient of 0.9802. It can be predicted that the 3D laser intensity measurement scheme proposed in this work has a broad prospect in the field of laser applications.
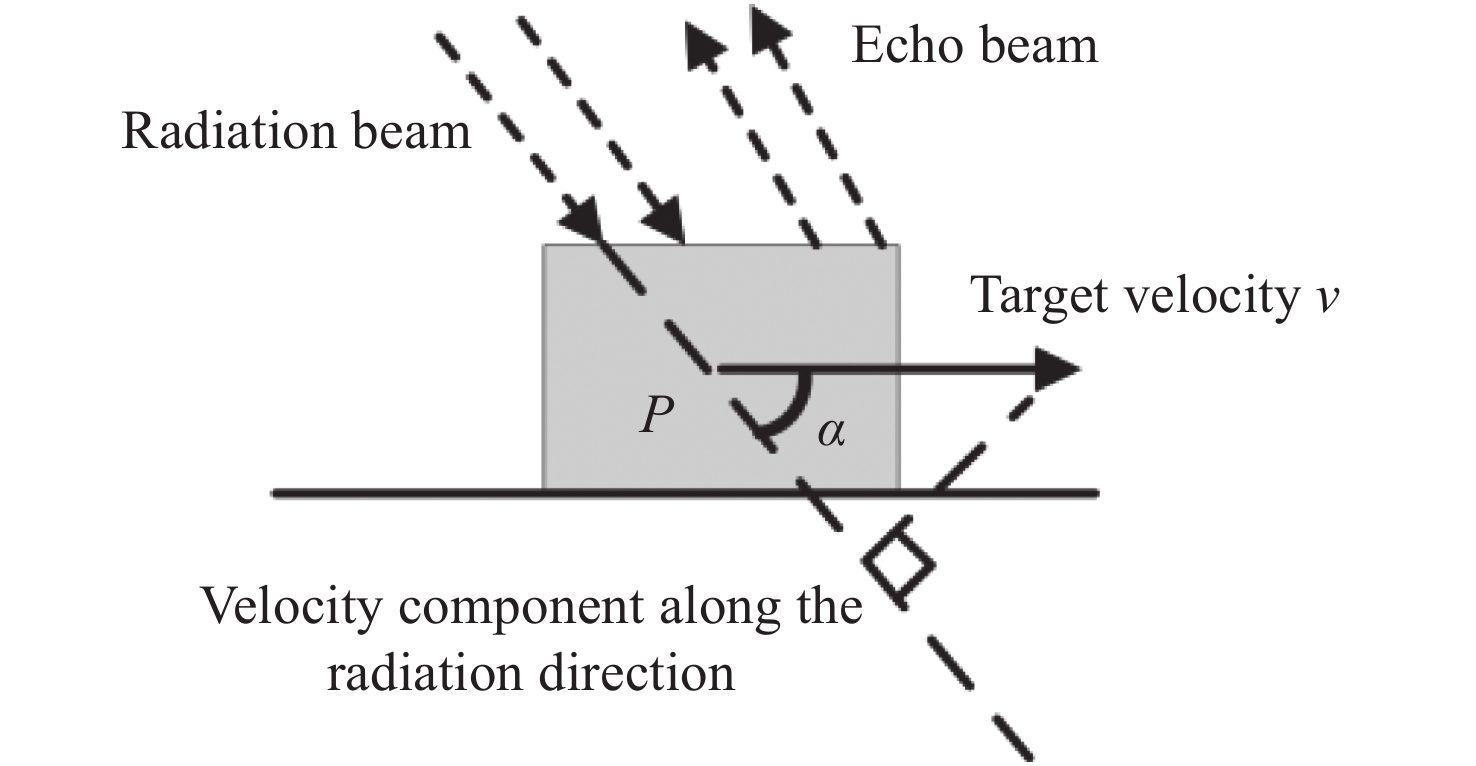
In order to eliminate the uncertainty caused by the inclination of a beam, a dual polarization laser Doppler velocimetry system is established. We use a structure with two beams and two probes to detect the motion of the object. Firstly, the angle between the two beams is obtained by a calibration experiment. For any beam inclination, the scattered beam on the surface of a moving object is collected by a dual-probe device, and the Doppler shift of the two interference signals is obtained by combining the dual polarization optical path structure. Then, the refined framing algorithm is applied to demodulate the two interference signals in real time. The real speed of the object is obtained through the synthesis of the two speed components. The experimental results show that the average deviation between the measured value and the theoretical value can reach 1%−5% when the speed is within the range of 10 mm/min~1500 mm/min. In the process of non-stationary motion, the mean RMSE of the v-t image corrected by the refining frame segmentation algorithm is 1.19 mm/min. The system’s structure meets the requirements of stability and reliability, high precision and strong anti-interference ability in speed measurement.
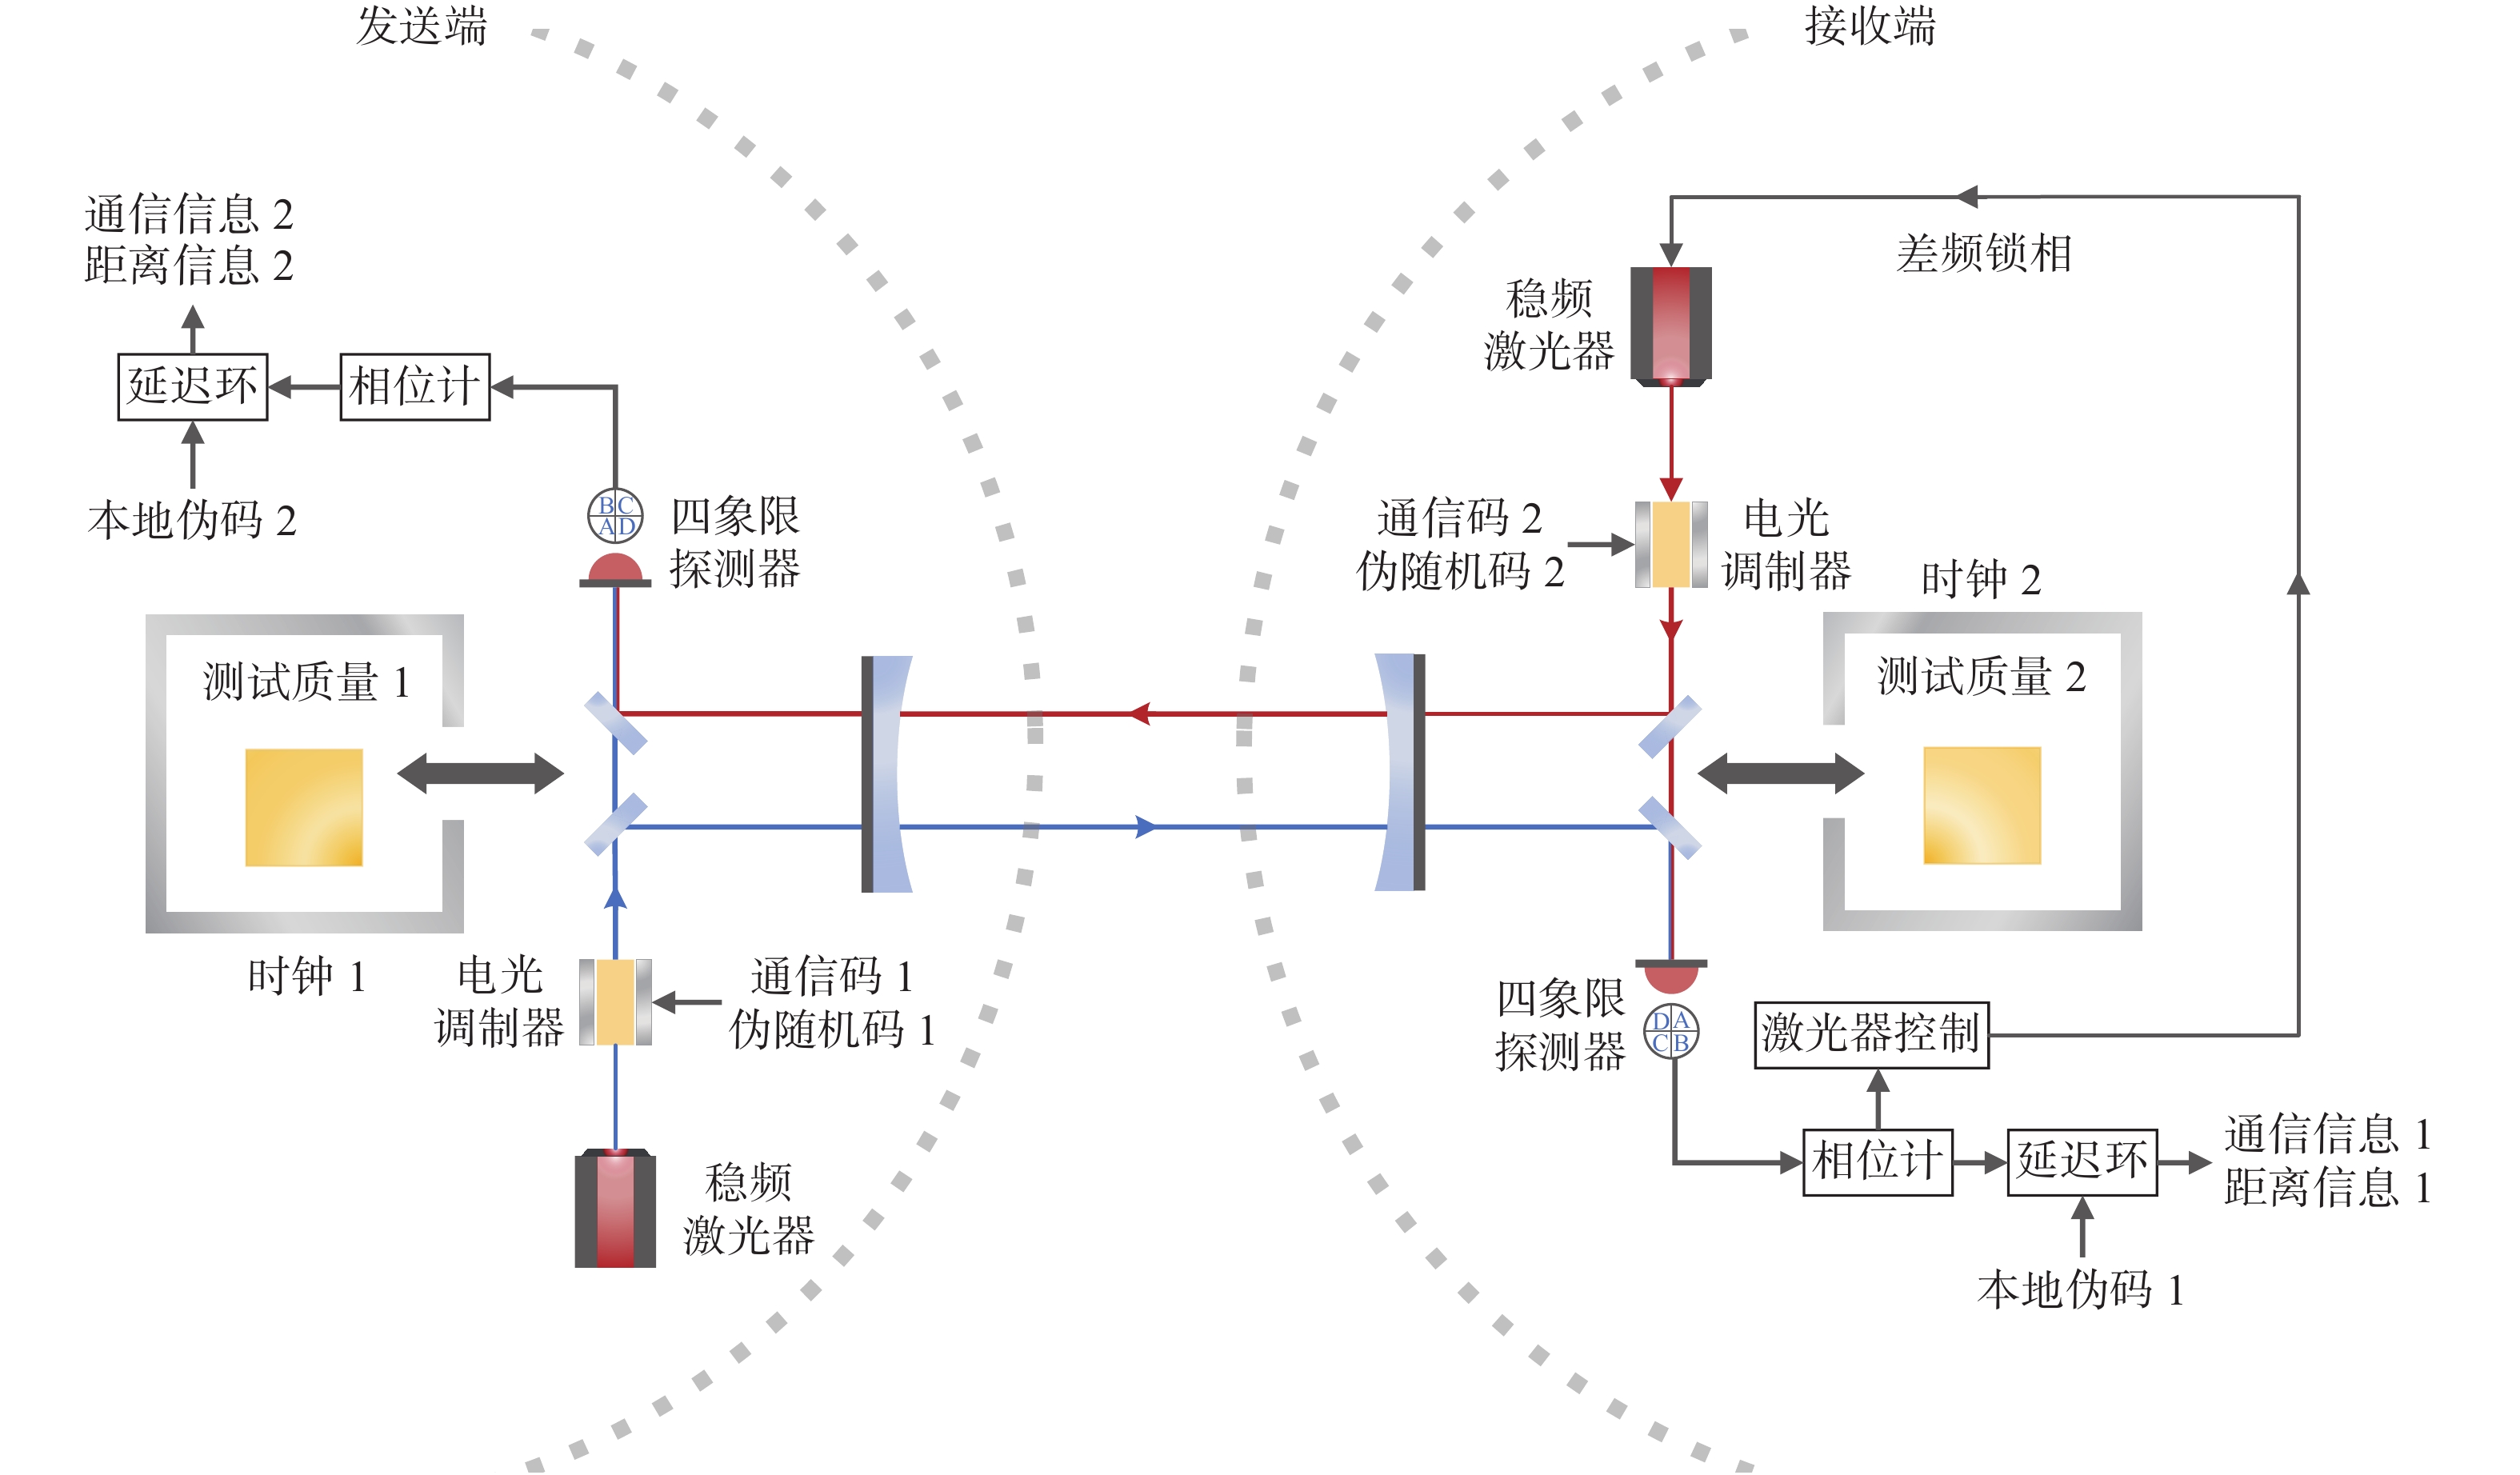
In the Taiji program, laser interferometry is utilized to detect the tiny displacement produced by the gravitational wave signals. Due to the large-scale unequal arm, the laser frequency noise is the largest noise budget in the space interferometer system. To reduce the influence of laser frequency noise, a technology called the Time Delay Interferometry (TDI) is utilized to deal with it. The TDI is a kind of data post-processing method, which forms the new data stream by the method of the time delay to initial data. But the premise of TDI needs to obtain accurate absolute arm length between satellites. Thus, for that requirement, we discuss the ranging system scheme and implement a ground electronics verification experiment. The ranging system is based on Direct Sequence Spread Spectrum (DS/SS) modulation, and it mainly includes three parts, which are the signal structure, a Delay Locked Loop (DLL), and a data processing algorithm. In DS/SS modulation, types of pseudo-random code can make a difference to the quality of correlation and the ranging accuracy. Therefore, to design the optimal pseudo-random code, we compare the correlation and flexibility in choosing lengths of the m sequence, gold sequence, and Weil code. Weil code that has a shift-cutoff combination with the best autocorrelation is chosen as the ranging code. The ground electronics verification experiment is set up for simulating the physical process of signal transmission and verifying system performance. The main device of the experiment is a FPGA card based on the K7 chip from Xilinx, which is used to simulate the function of communication and ranging between satellites. Meanwhile, we change the length of the Radio Frequency (RF) coaxial cable to correspond to different ranges. The experimental process can be summarized as follows. Firstly, 16-bit data at 24.4 kbps and 1024-bit Weil code at 1.5625 Mbps are modulated with Binary Phase Shift Keying (BPSK) in the 50 MHz sampling frequency. Then the signal is transmitted through RF coaxial cables of 10 to 60 m in length. In receiving end, the signal is consolidated by DLL and the ranging information is collected. To measure the range accurately, we use a centroid method to optimize the collected data. The results show that the ranging accuracy is better than 1.6 m within 60 m. In conclusion, this experiment proves the principle of the scheme and its feasibility, laying a technical foundation for optical system verification in the future.
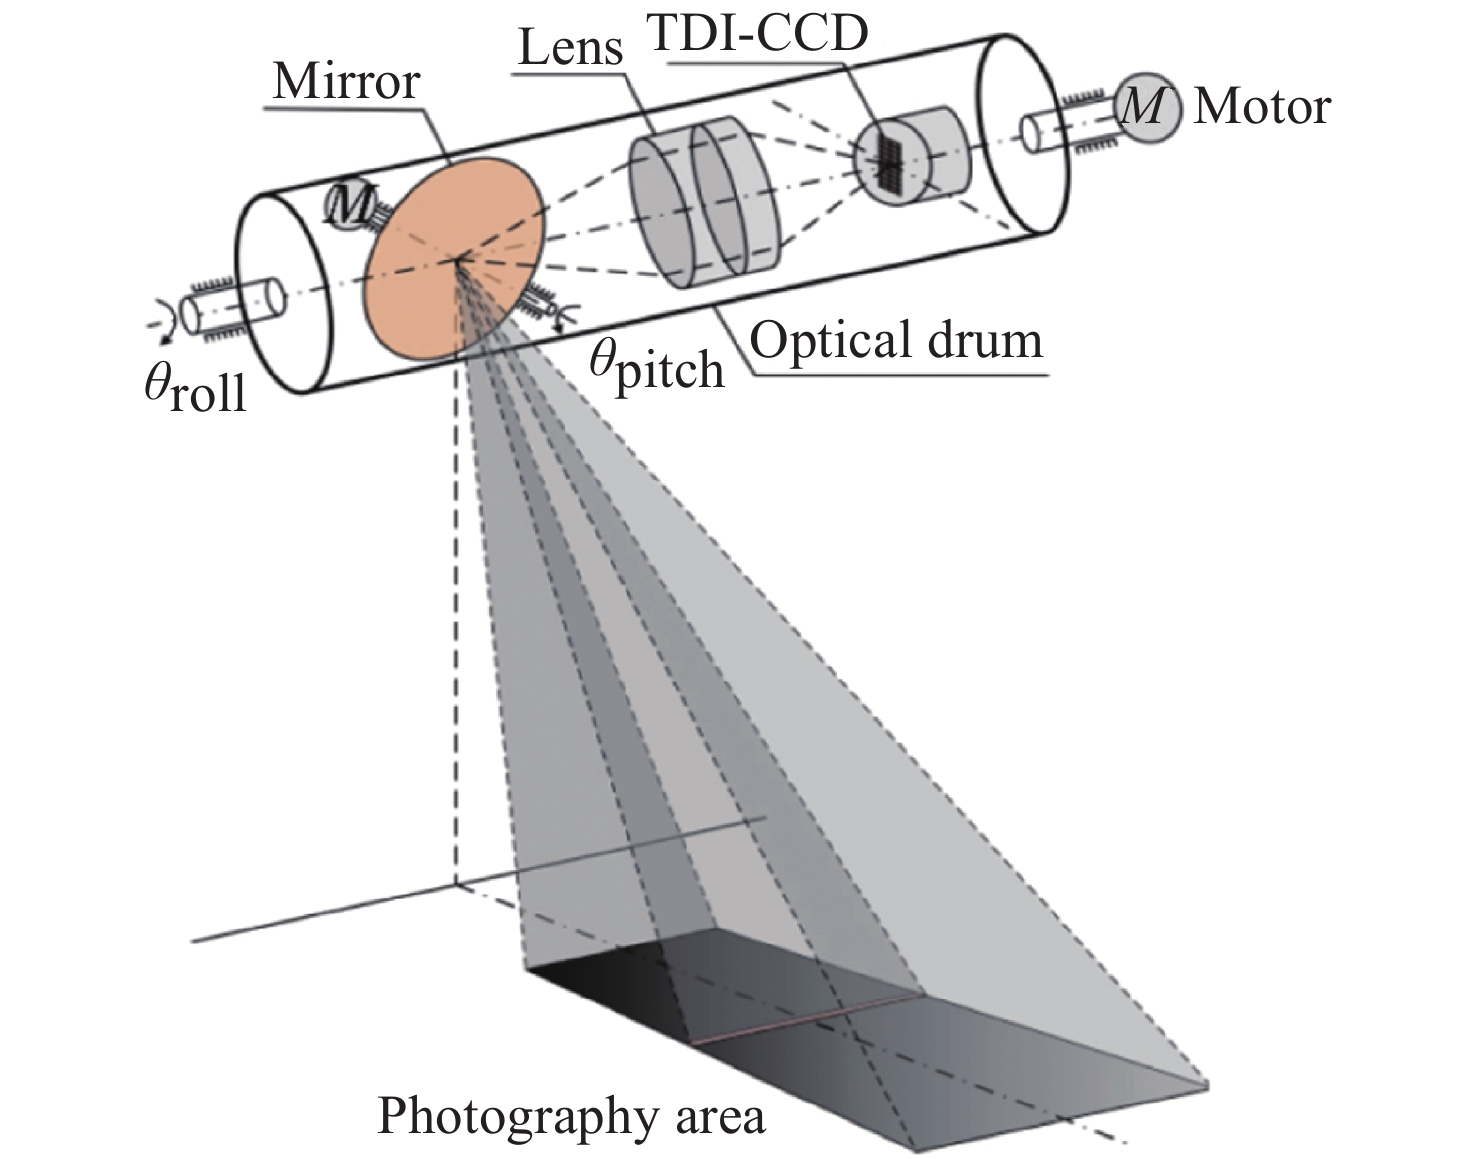
In the positioning process of aerial cameras with large inclination angles, the influence of height error in the earth ellipsoid model can be effectively solved with the help of a digital elevation model (DEM). This is very important for obtaining accurate ground coordinates, especially elevation. Firstly, the orientation of the line-of-sight angle in the geographic coordinate system is solved by transforming homogeneous coordinates according to the position and attitude information of the carrier aircraft and the frame angle information of the aerial camera, and then the longitude and latitude of the target point are determined by a digital elevation model. To overcome the tedious nature of calculating target elevation and the non-convergence in the imaging process, a fast iterative method is proposed to iterate over the target elevation’s value. The difference between the light elevation of the visual axis and the ground elevation is calculated by halving the target elevation. The median elevation difference is calculated iteratively until it is less than a certain threshold. Finally, Monte Carlo analysis was used to analyze the error terms in the whole imaging process. When the convergence threshold is 1/10 DEM in grid accuracy, the iteration efficiency increases by 45.5% and the convergence speed is greatly improved. Through the calculation of the digital elevation model, when the flight height is 15,409 meters and the camera frame’s angle is greater than 74°, a mountainous area’s target circular error probability is less than 200 m which meets the real engineering needs.
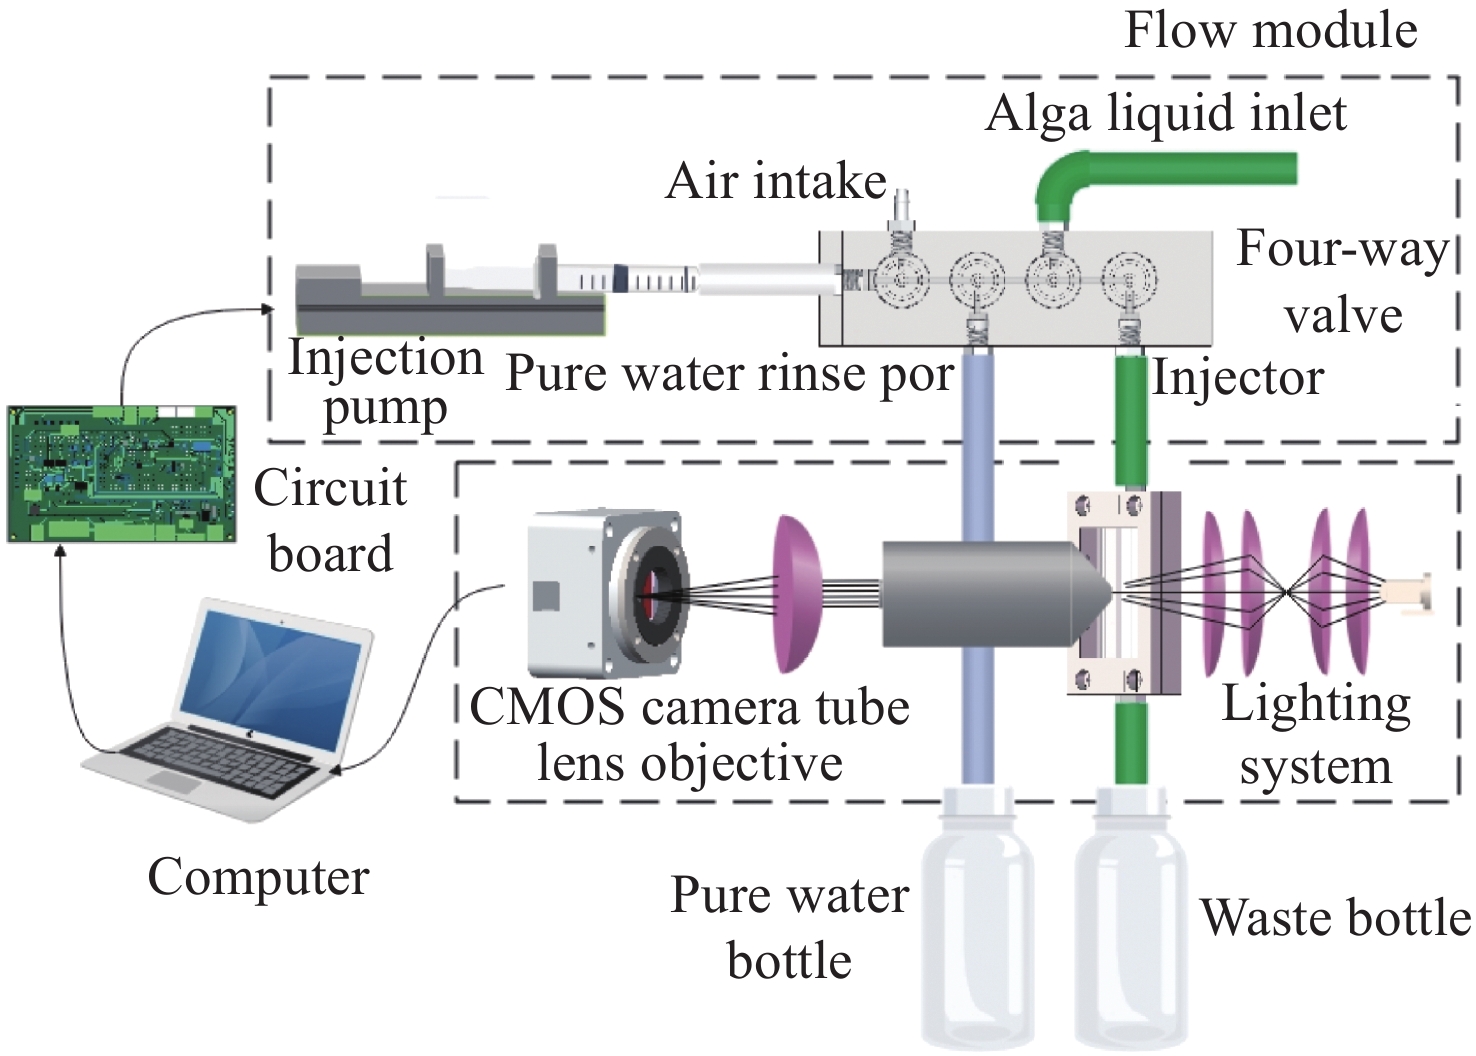
Flow cytomicrographic analysis is an important development in the automatic identification of planktonic algae in a water column, but the accuracy of this process is affected by the deformation of microscopic images under rapid injection conditions. Based on a microfluidic-microscopic imaging system for planktonic algae, the effects of flow rate on the deformation of microscopic images were investigated by analyzing the deformation of algal cells and image clarity at different injection flow rates. Based on the principle of deformation caused by photographing a moving object using a rolling shutter, a method of image deformation correction with unidirectional offset pixels is proposed and analyzed by comparing its results with images acquired under static conditions of algal cells. The experimental results showed that the average aspect ratio and sharpness of
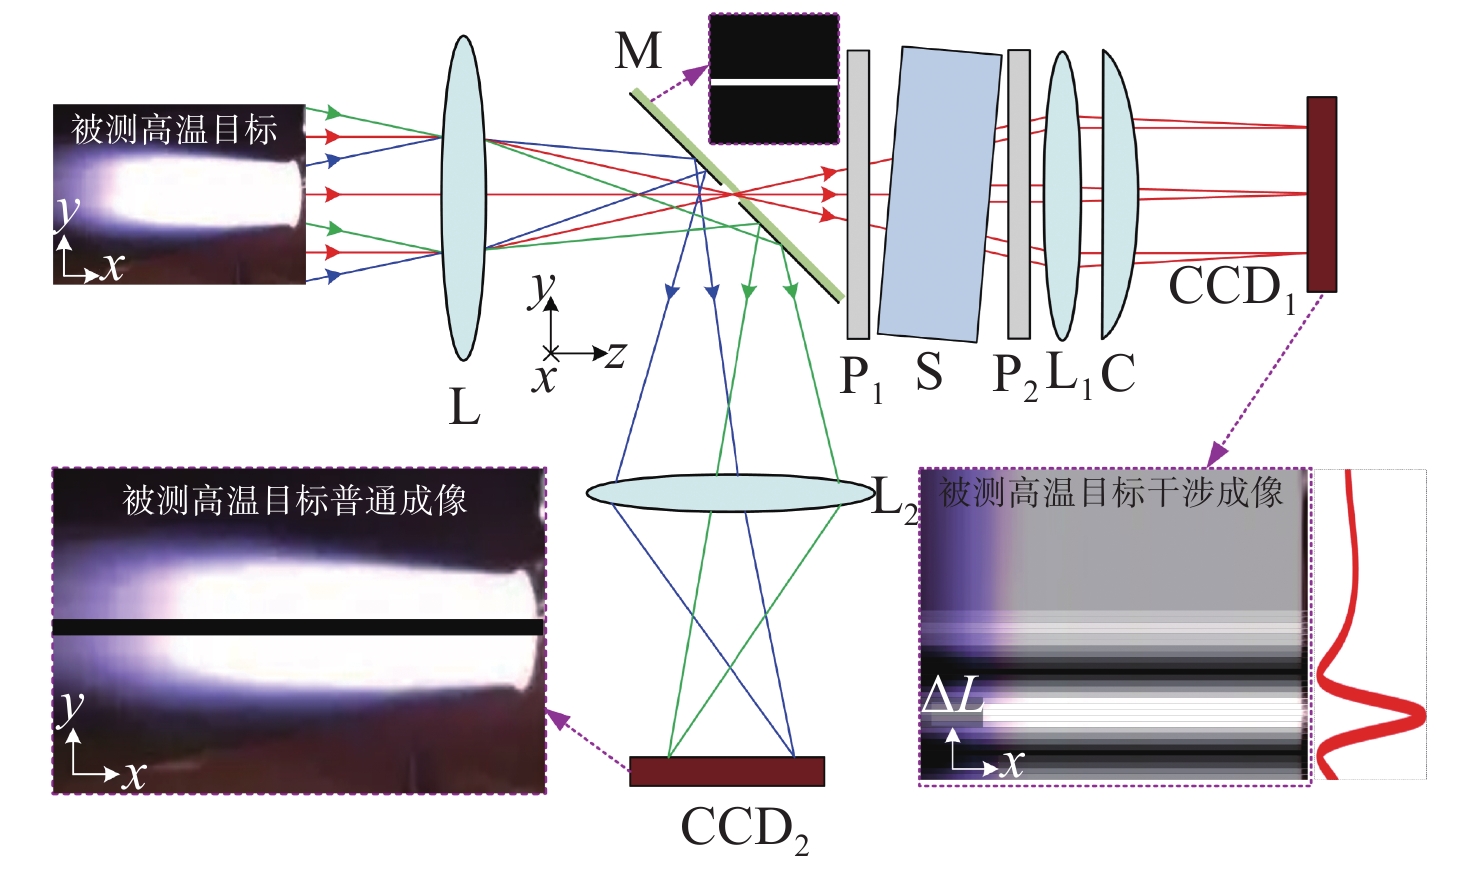
In order to realize the non-contact high-precision measurement of high-temperature temperature fields such as the tail flame, combustion and explosion of aerospace engines, a static interferometric high-temperature temperature field imaging and detection method is studied. Firstly, a static interference high-temperature temperature field detection system is designed. On the basis of theoretical analysis of the measurement principle of high-temperature temperature fields, the relationship between the optical path difference and the temperature at the lowest point of high-temperature interference signal intensity is studied. Secondly, according to the response band of the visible light area array detector and the common temperature range, a static interferometric Savart prism is designed, and temperature field imaging is realized by using it for one-dimensional scanning. Finally, the optical system is designed and the corresponding relationship between the minimum optical path difference of the interference and the temperature is obtained by fitting. From this, the linear fitting formula is obtained. Simulations are conducted to verify the interference signal image where the temperature field after passing through the system reaches the area detector. The static interferometric high-temperature temperature field detection method can achieve the high-precision detection of 1000 K−3000 K temperatures. In the linear region, the temperature measurement resolution is 1.4 K and the temperature measurement relative error is better than 0.8%. This research lays the foundation for high-precision high-temperature temperature field imaging in the military and civilian fields.
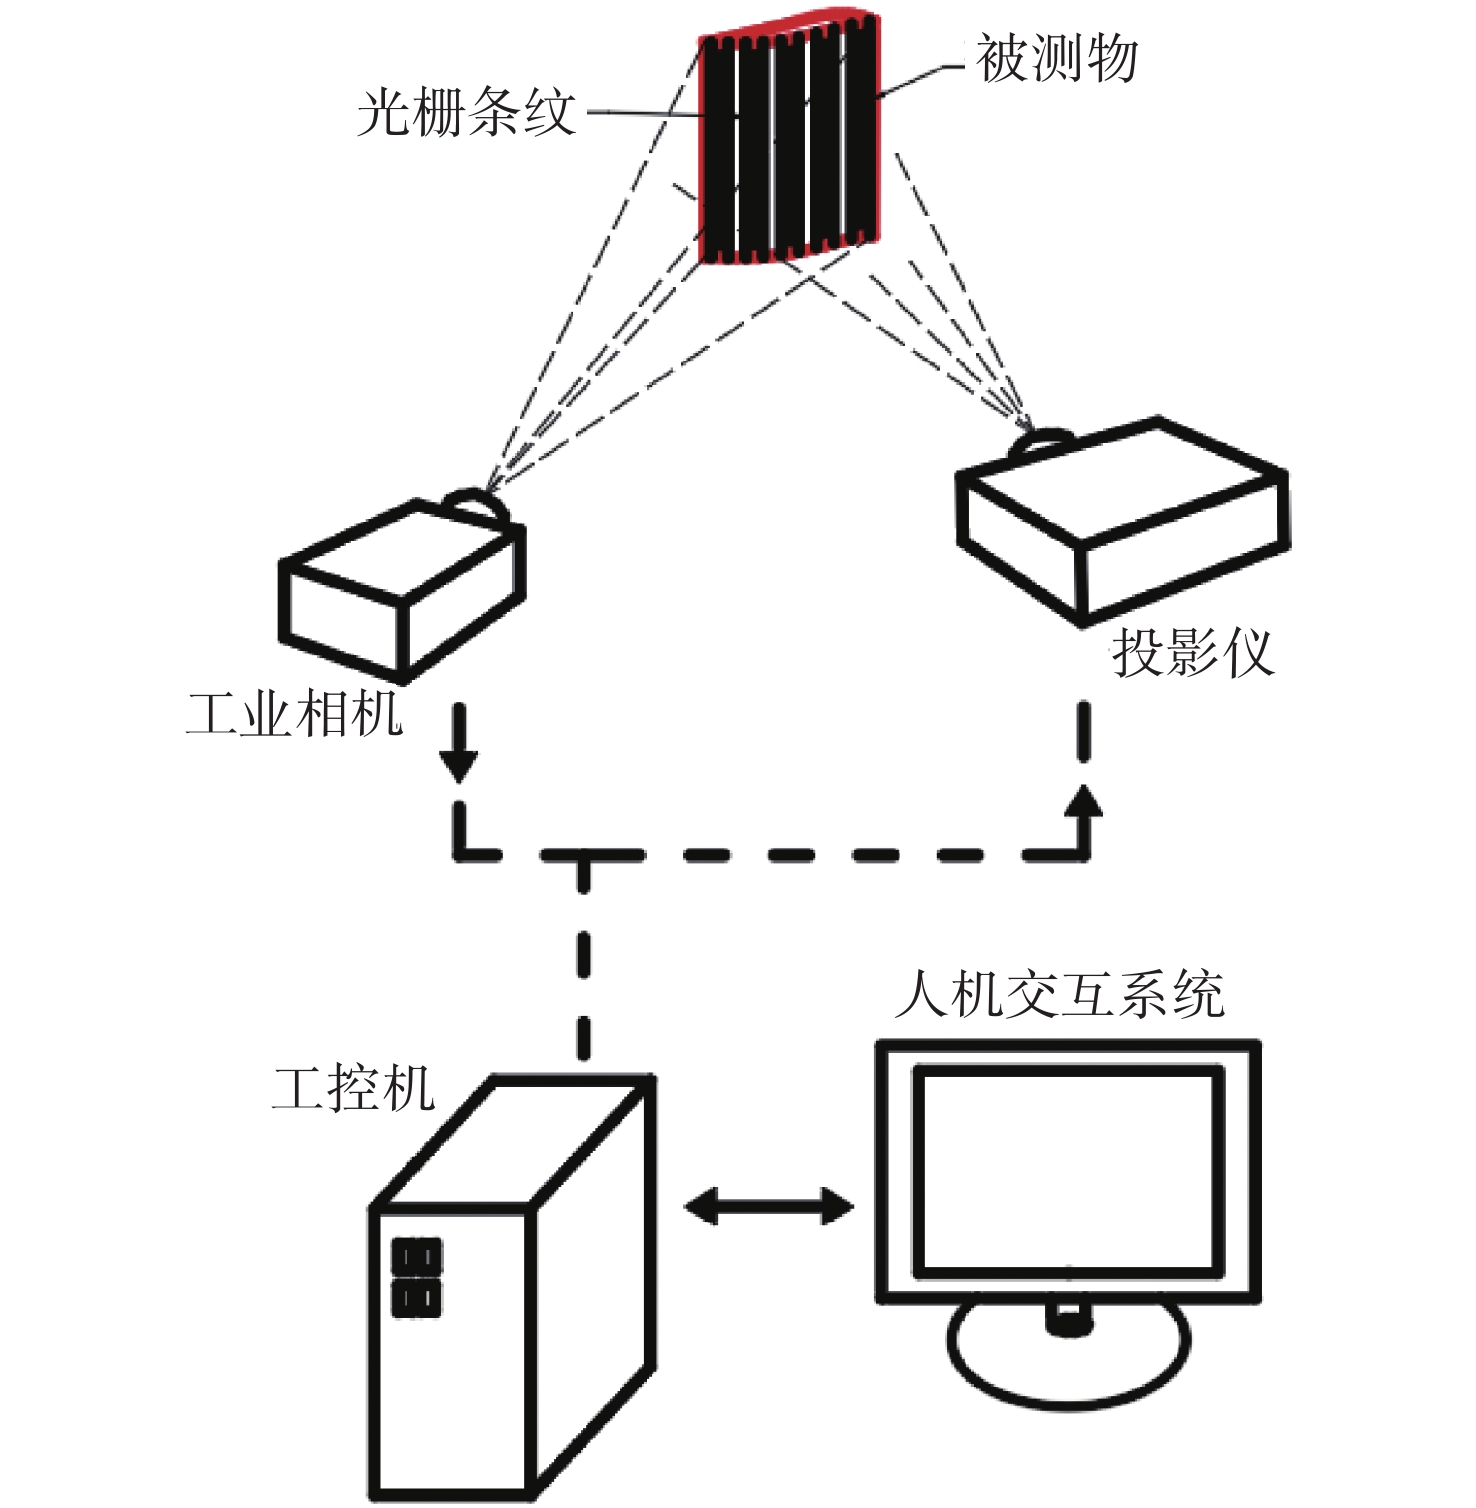
The machining quality and detection accuracy of aero-engine blades have a very important influence on their service life of blades. To improve the accuracy of blade detection, a high-precision scanning viewpoint planning method based on structured light is proposed in this paper. Firstly, coarse model data was obtained by coarse scanning under the overall size of the blade, and the field of view was determined according to the camera resolution and acquisition accuracy. Secondly, an improved Angle Criterion algorithm was used to extract the boundary, and the boundary segmentation points were determined according to the boundary coordinates and the range of the visual field. The coarse model was sliced by the section line method for a surface, and the internal segmentation points were determined according to the slice results to complete the uniform segmentation of point clouds. Then, a directed bounding box was established for the segmented point cloud data to obtain the coordinates of the center point, and the normal vector was statistically analyzed to determine the orientation of the main normal to generate the viewpoint coordinates for high-precision scanning. Finally, the surface morphology of the blade was tested and verified. The experimental results show that the average standard deviation of the proposed method is reduced by 0.0054 mm and the collected viewpoint is reduced by 1/3 compared with the viewpoint acquisition result of the supervoxel segmentation, which has good application prospects in the machining inspection of thin-walled blades.
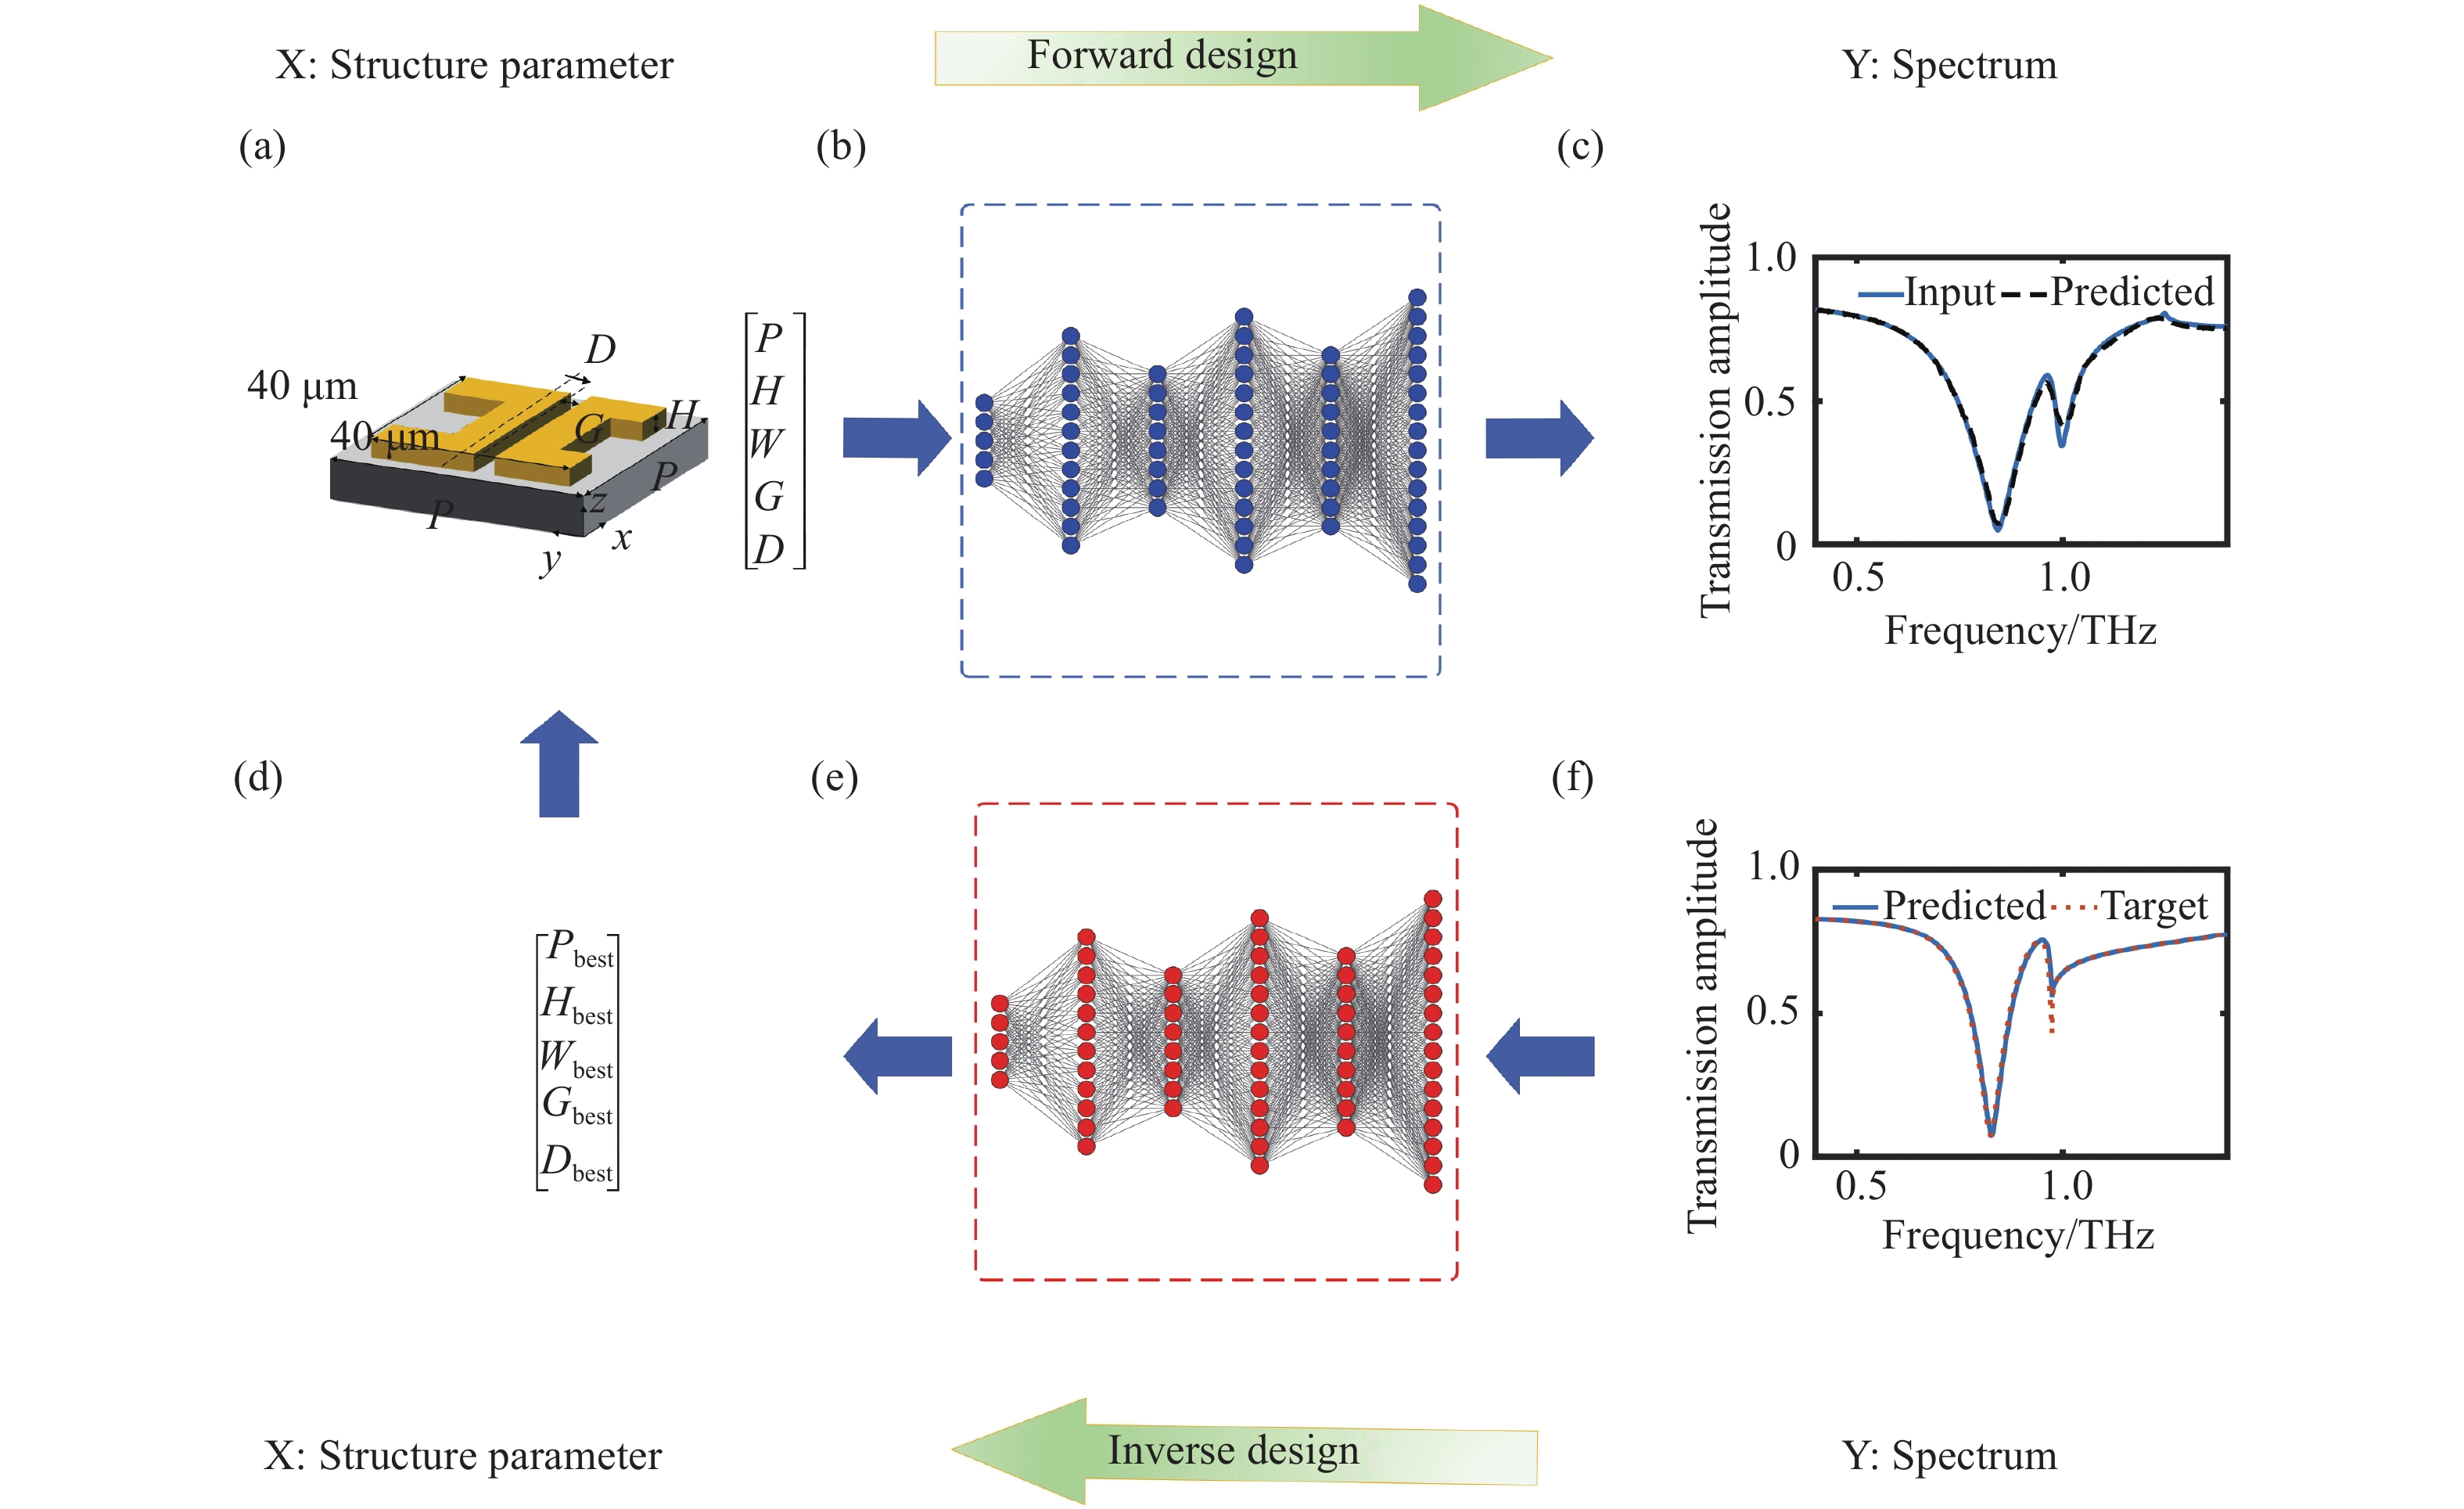
In this paper, a metamaterial Fano resonance design method based on deep learning is proposed to obtain high-quality factor (high-Q) resonances with desired characteristics, such as linewidth, amplitude, and spectral position.The deep neural network is used to establish the mapping between the structural parameters and the transmission spectrum curve. In the design, the forward network is used to predict the transmission spectrum, and the inverse network is used to achieve the on-demand design of high Q resonance. The low mean square error ( MSE ) is achieved in the design process, and the mean square error of the training set is 0.007. The results indicate that compared with the traditional design process, using deep learning to guide the design can achieve faster, more accurate, and more convenient purposes. The design of Fano resonance can also be extended to the automatic inverse design of other types of metamaterials, significantly improving the feasibility of more complex metamaterial designs.
In order to improve the quality value (
Multiple sub-aperture interference imaging enables the images formed by the sparse aperture imaging system to have a higher resolution after the cophasing error is corrected. In this paper, the MTF and surface target imaging of the system are analyzed with a Golay3 sparse aperture imaging system as the research object when there are different piston and tilt errors among the sub-apertures. A Golay3 sparse aperture imaging system was developed to carry out an imaging experiment with the USAF1951 resolving power test target as the area target. Three-aperture synthetic imaging is achieved by adjusting the position of the plane mirror in the light beam deflection and the adjustment module to correct the piston and tilt errors of the sub-apertures. The results of a theoretical analysis are then verified. According to calculations, the developed system’s angular resolution of 1.38 μrad is close to the equivalent single-aperture imaging system’s theoretical resolution of 1.18 μrad. The developed Golay3 sparse aperture imaging system can correct the cophasing errors and improve the imaging resolution.
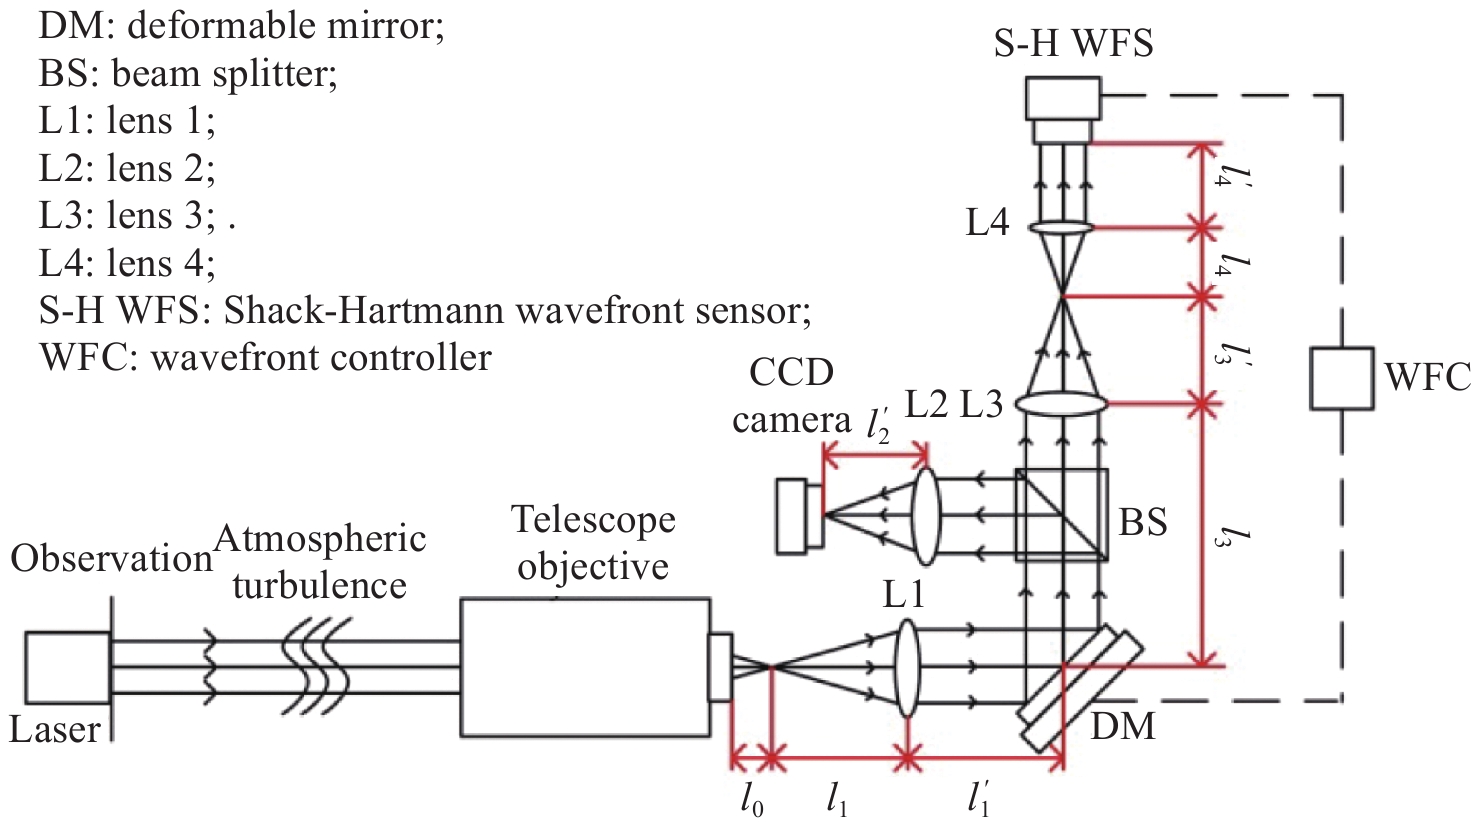
In order to overcome the adverse effects of near-ground turbulence on the imaging quality of the optical systems at imaging distances of tens to hundreds of meters, an optical imaging system based on a long focal length telescopic objective lens and an integrated adaptive module is designed. With a system center height of 1.9 m and the imaging distance of 50−200 m, the outdoor imaging experiment of a resolution plate is carried out. The experimental results show that the influence of turbulence on imaging quality is obvious at medium and long distances of 50−200 m near the ground. The experimental system can effectively overcome the influence of turbulence at different distances and improve the consistency of image resolution and clarity. As the imaging distance increases, the influence of turbulence increases, and the system’s correction ability and the imaging quality decrease. The imaging resolution of the system can reach 0.5 mm at an imaging distance of 100 m. Cracks on the surface of a concrete model are observed and corrected at a distance of 200 m. The experimental results show that the system can suppress the influence of turbulence and improve the clarity of the image, which verifies the practical application ability of the system.
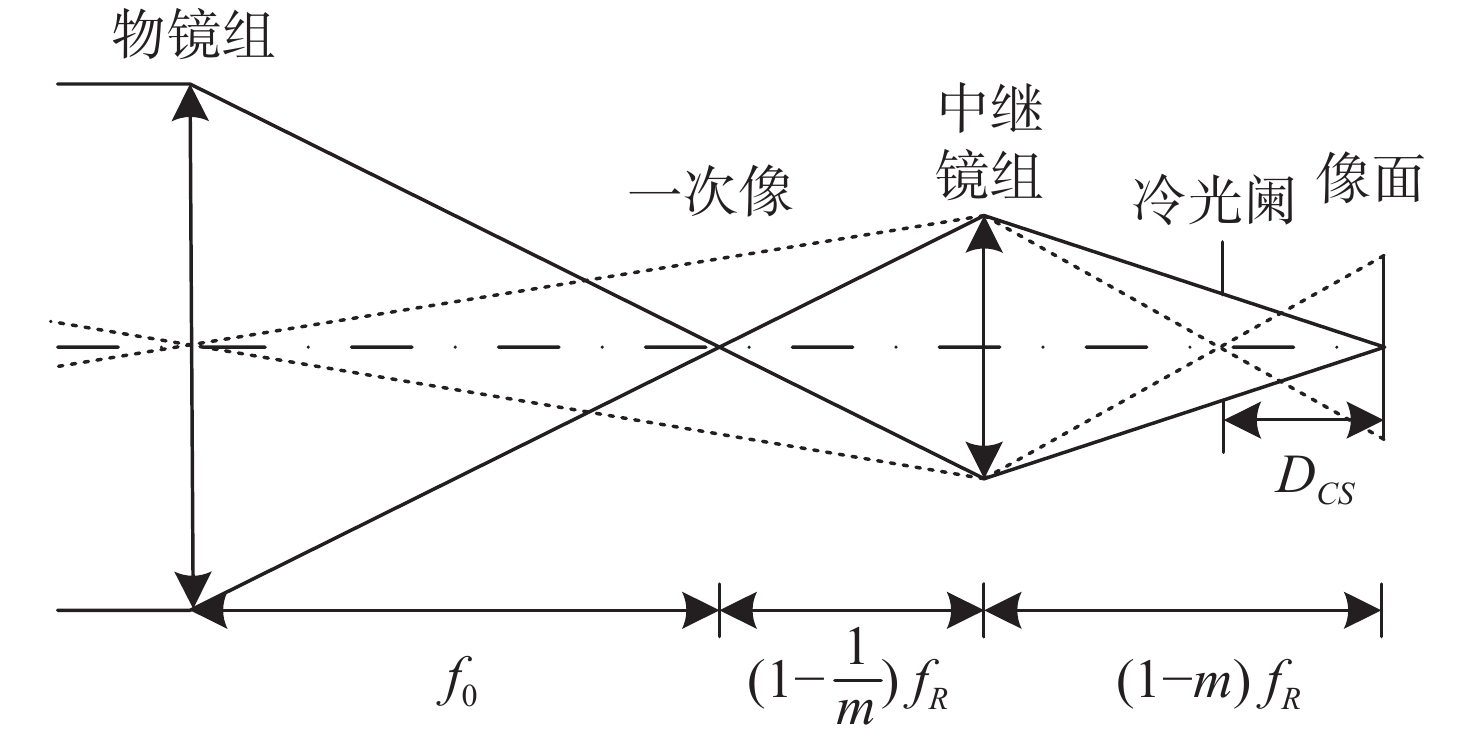
Under conditions with large temperature differences, the imaging quality of an infrared optical system will deteriorate due to severe temperature changes. Large field-of-view medium-wave infrared cameras for airborne forest fire monitoring work in drastically changing environments, so the optical system has high requirements for stray radiation. In order to ensure that the optical system performs stably and with good imaging quality in the large field-of-view and the required large temperature range, a cooled medium-wave infrared optical system is designed based on athermalization and the comprehensive evaluation method of stray radiation based on noise equivalent temperature difference. The optical system consists of 6 lenses and 1 filter with working wavelength of 3.7−4.8 μm, F-number 2.5, focal length 62.5 mm, and field of view 14.36°×10.87°, respectively. The pixel resolution of the medium-wave cooled detector is 640×512. By using a combination of silicon and germanium materials and reasonably distributing the optical power, achromatic aberration and athermalization designs are realized. Through cold reflection optimization and cold aperture matching, stray radiation noise in the system is well-suppressed. By a bit of aspheric optimization, higher-order aberrations are corrected based on the requirements. The results show that the imaging quality of the optical system is stable and good in the temperature range of −55~+70 °C.
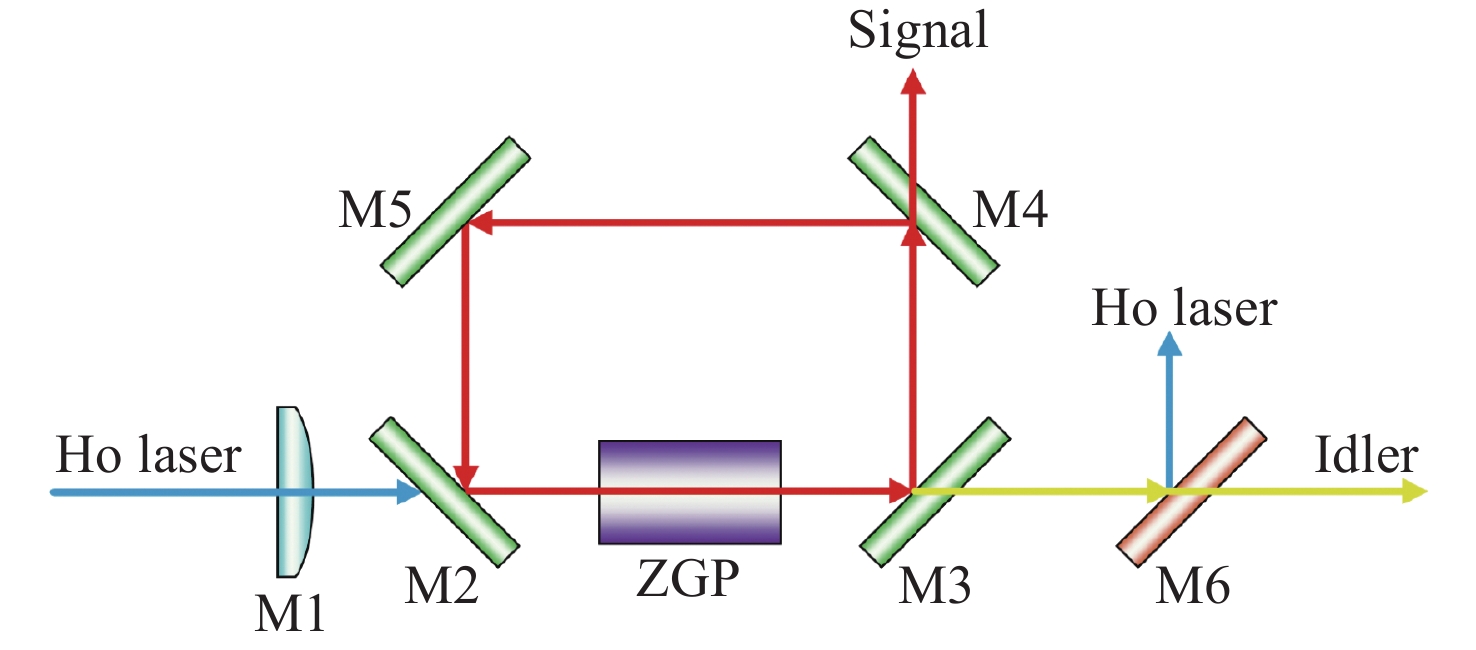
In order to realize tunable longwave infrared laser, we design a ZGP temperature tuned longwave infrared optical parametric oscillator. A Ho:YAG laser with the center wavelength of 2097 nm is used to pump ZGP crystals with different phase matching angles. The temperature adjustable properties of ZGP-OPO is researched by changing the operating temperature of crystal. The laser with a segment continuously tunable range of 7.53−8.77 μm is realized in the temperature range of 15−30°C, with a total tuning range of 1.24 μm. The output power of ZnGeP2-Optical Parametric Oscillator(ZGP-OPO) is greater than 1.503 W over the entire tuning range. The output power is 1.503 W at the idler wavelength of 8.77 μm, and the corresponding slope efficiency and optical conversion efficiency are 12.19% and 6.53%, respectively. The experimental results show that temperature tuning of ZGP is an effective technical method to obtain continuously tunable long-wave infrared laser. This research has potential application value in the field of engineering of tunable long-wave laser.
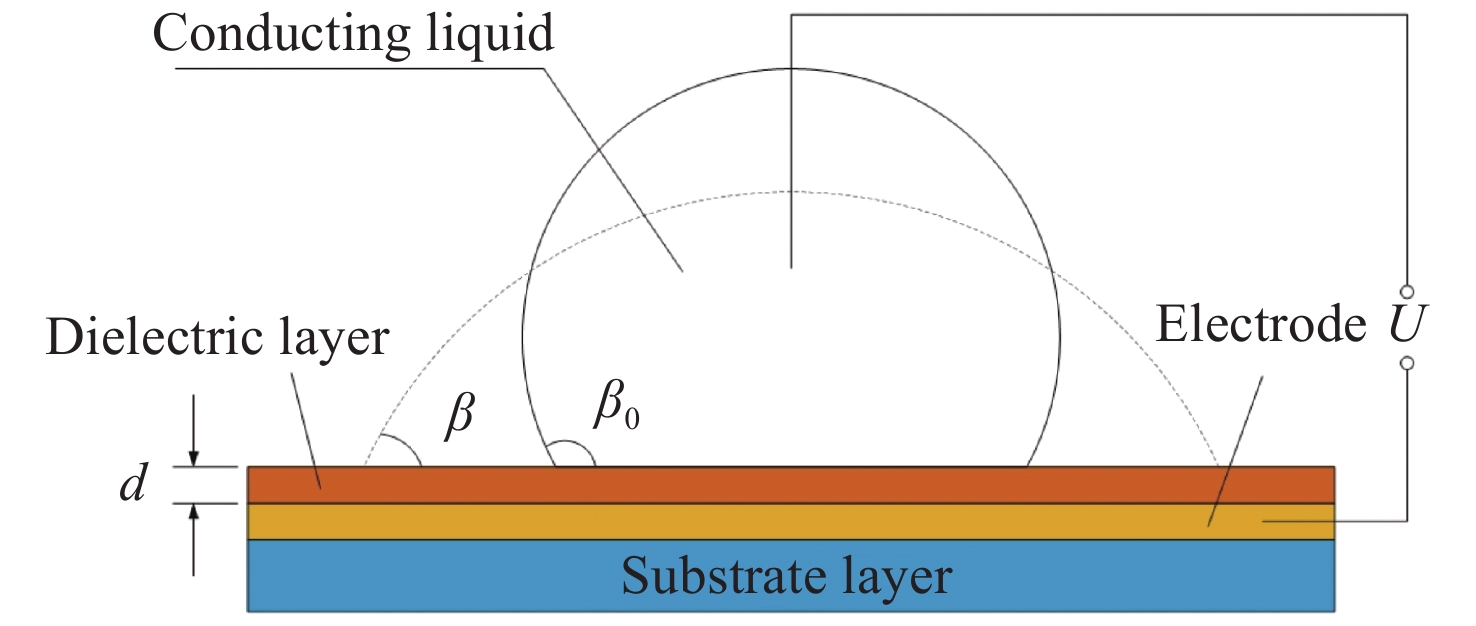
Tacking the research of glass lenses as reference, a statistical data-based index of liquid lens zoom stability and liquid lens repeated zoom accuracy is proposed. An experimental method is presented to optimize the structural parameters and materials of the liquid lens. Firstly, the main factors affecting the accuracy of a liquid lens’ repeat zoom accuracy were obtained through preliminary experimental research, including the polar solution volume, taper and non-polar solution viscosity. Secondly, taking the accuracy of the liquid lens’s repeat zoom accuracy and zoom range as evaluation indicators, it was found that the relationship between the accuracy of the liquid lens’s repeat zoom and the voltage is not monotonic, and that it rises first and then falls. On this basis, through the range analysis and comprehensive balance method, the primary and secondary factors and the optimal combination of parameters is obtained. After that, orthogonal experiments were used to optimize the design parameters. Finally, the effectiveness of this method was verified by experiments. The experimental results show that the repeat zoom accuracy of the optimized liquid lens is 0.2 m−1, and the zoom range is −15.2−5.85 m−1 over the voltage range of 0 to 230 V. It basically meets the requirements of stable and reliable, high precision, and large zoom range for liquid lens zoom.
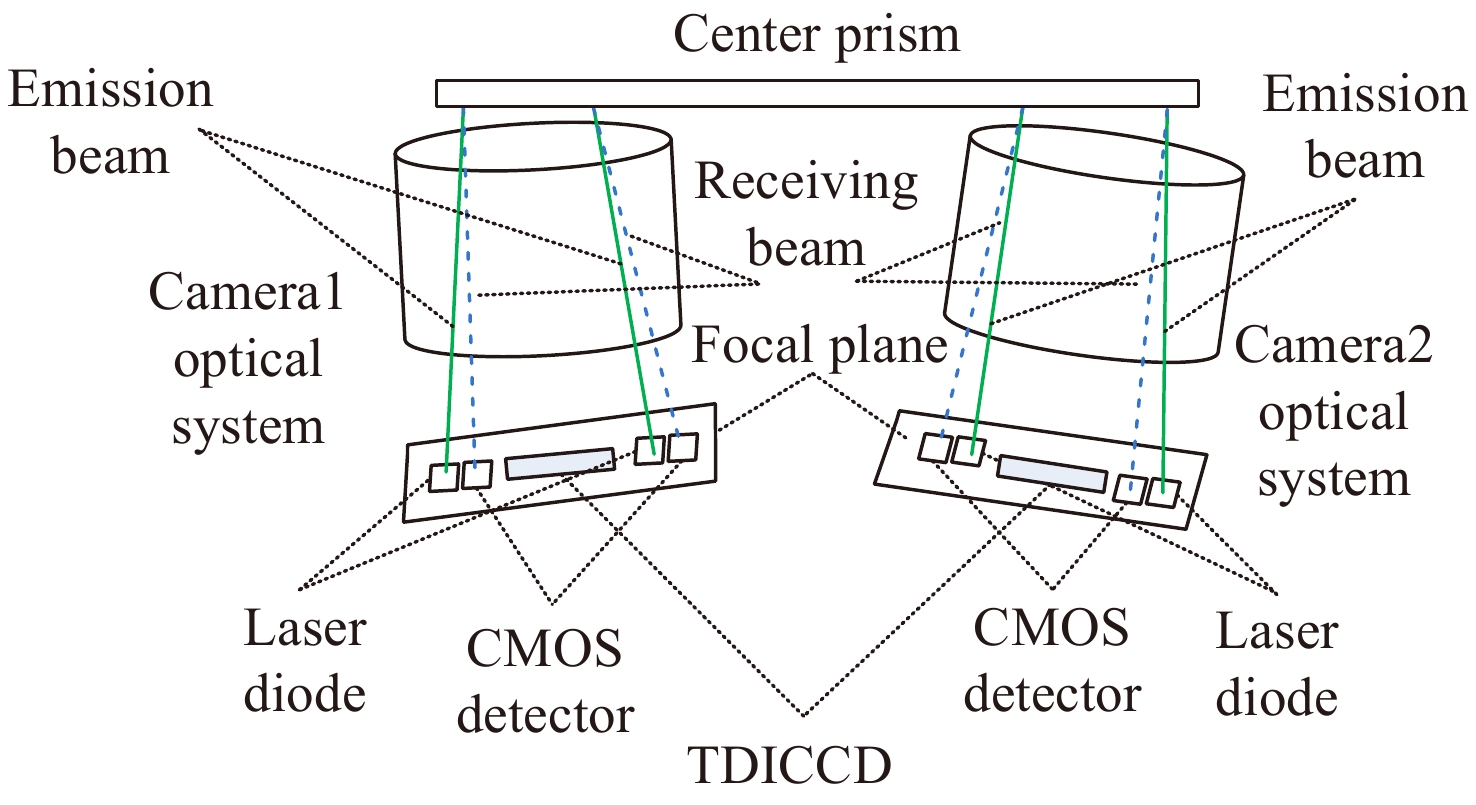
In order to realize the real-time measurement of the boresight vibration of the dual line array surveying and mapping camera, a measurement model of the optical axis of the aerospace line array surveying and mapping camera is established. First, by setting up laser transceivers at both ends of the focal plane of the camera, through the central prism correlation, an angle parameter change measurement model for the two cameras is constructed. An optical axis measurement method for multi-line array cameras based on the dual-vector attitude determination principle is proposed. The calculation expression is given and the algorithm error is analyzed, which is verified by simulation. In addition, the residuals of the two algorithms are simulated and the results show that the simplified algorithm is only in good agreement with the dual vector algorithm in a small measurement range but when the detection range is expanded to 2 seconds, the algorithm in this article can be used to obtain 0.1 arc-second. Finally, the algorithm was tested and verified in a thermal vacuum environment, which verified that the calibration accuracy of the internal and external parameters of the camera using this algorithm reached 0.1 arc-second. The results showed that the angle parameters of the two cameras exhibited the periodicity of the orbit, which provided good conditions for the subsequent development of stereo surveying and mapping tasks.
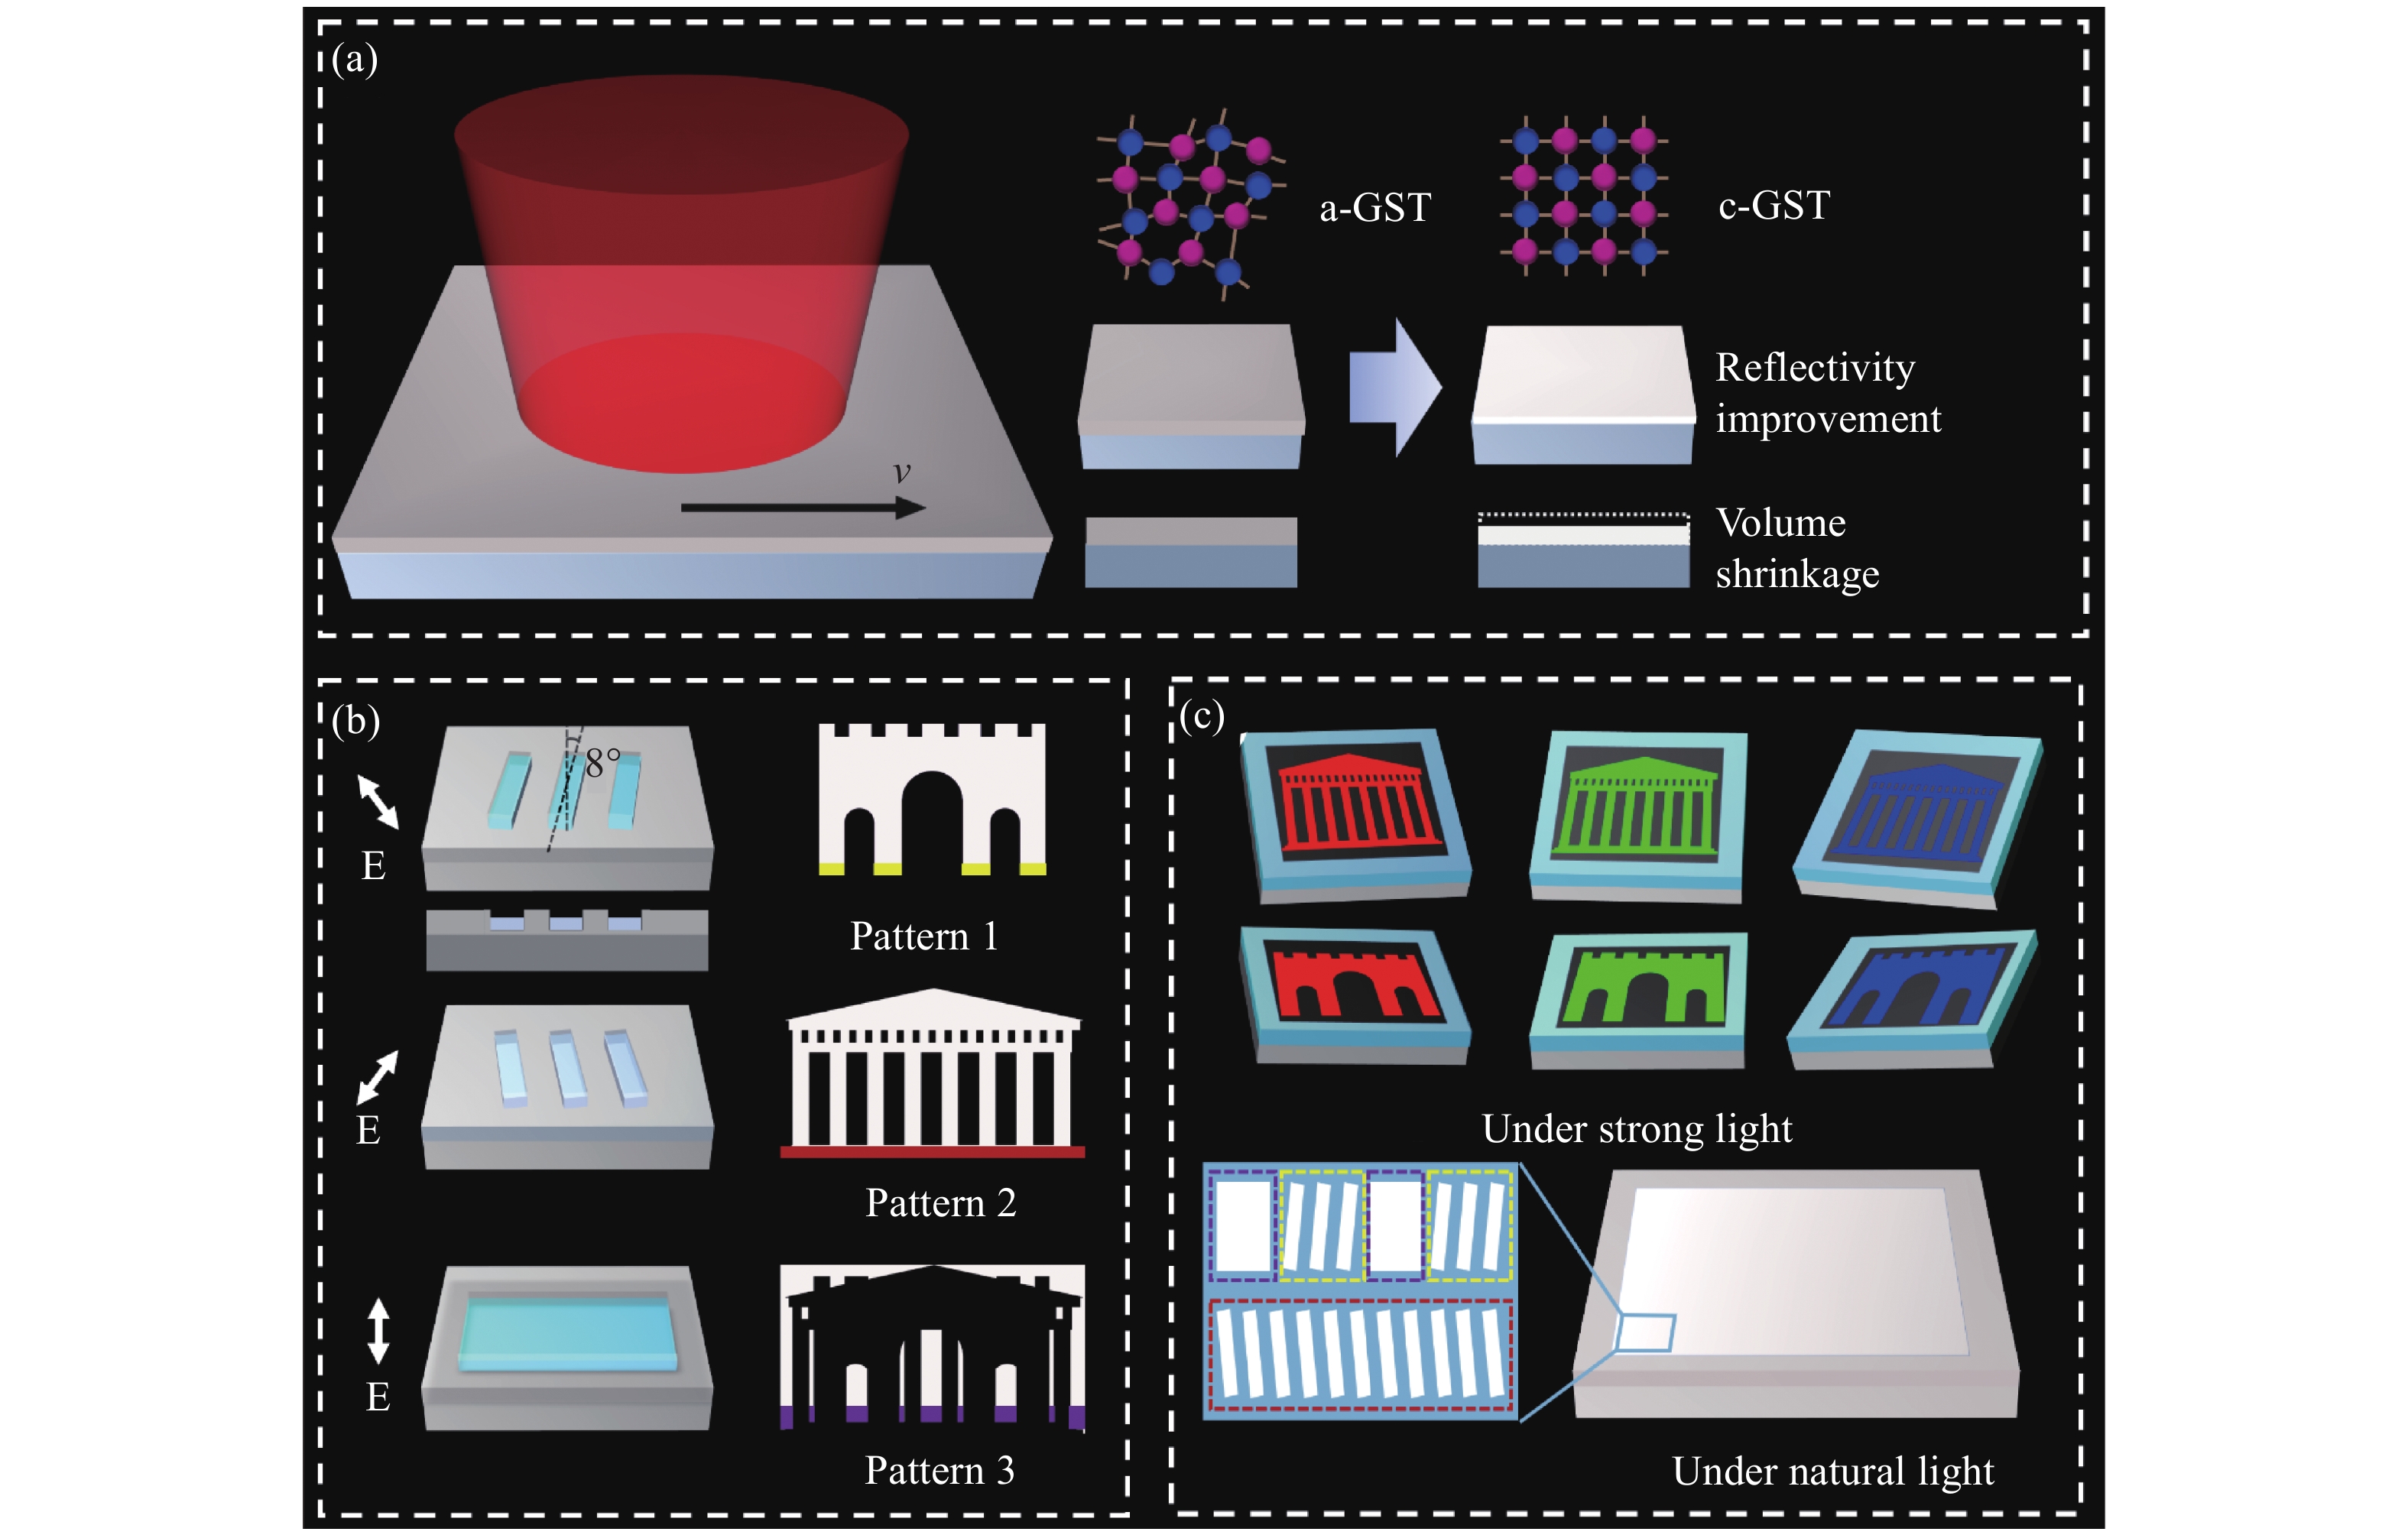
The optical encrypted metasurface based on one-dimensional grating diffraction requires the processing of mask or unit structure one by one, resulting in low efficiency. In addition, the poor uniformity of the structure formed by conventional ablated LIPSS can also affect device performance. Aming at the above problems, an optical metasurfaces processing method is proposed based on modified structures obtained by picosecond laser direct writing phase-change material Ge2Sb2Te5. Firstly, the dispersion properties of the prepared GST-modified gratings are first characterized, and the angle-multiplexed information encryption metasurfaces are designed by combining the polarization dependence of the modified grating, and the metasurface prepared by the proposed method is further demonstrated. In addition, the performance of encryption under natural light conditions and selective decryption reading and dynamic display under strong light conditions has been achieved. Compared to the conventional processing method, the proposed method can generate a series of grating structures in the form of simultaneous printing in a direct writing process, which improves the processing efficiency. At the same time, the grating structure obtained by processing has good uniformity and consistency, which improves the color rendering effect. A modified grating with an orientation angle difference of 16° is used to realize selective information reading without crosstalk resulting in uniform and bright structural colors. The processing strategy proposed in this paper has a profound application prospect in the fields of anti-counterfeiting, information encryption storage and wearable flexible display devices.
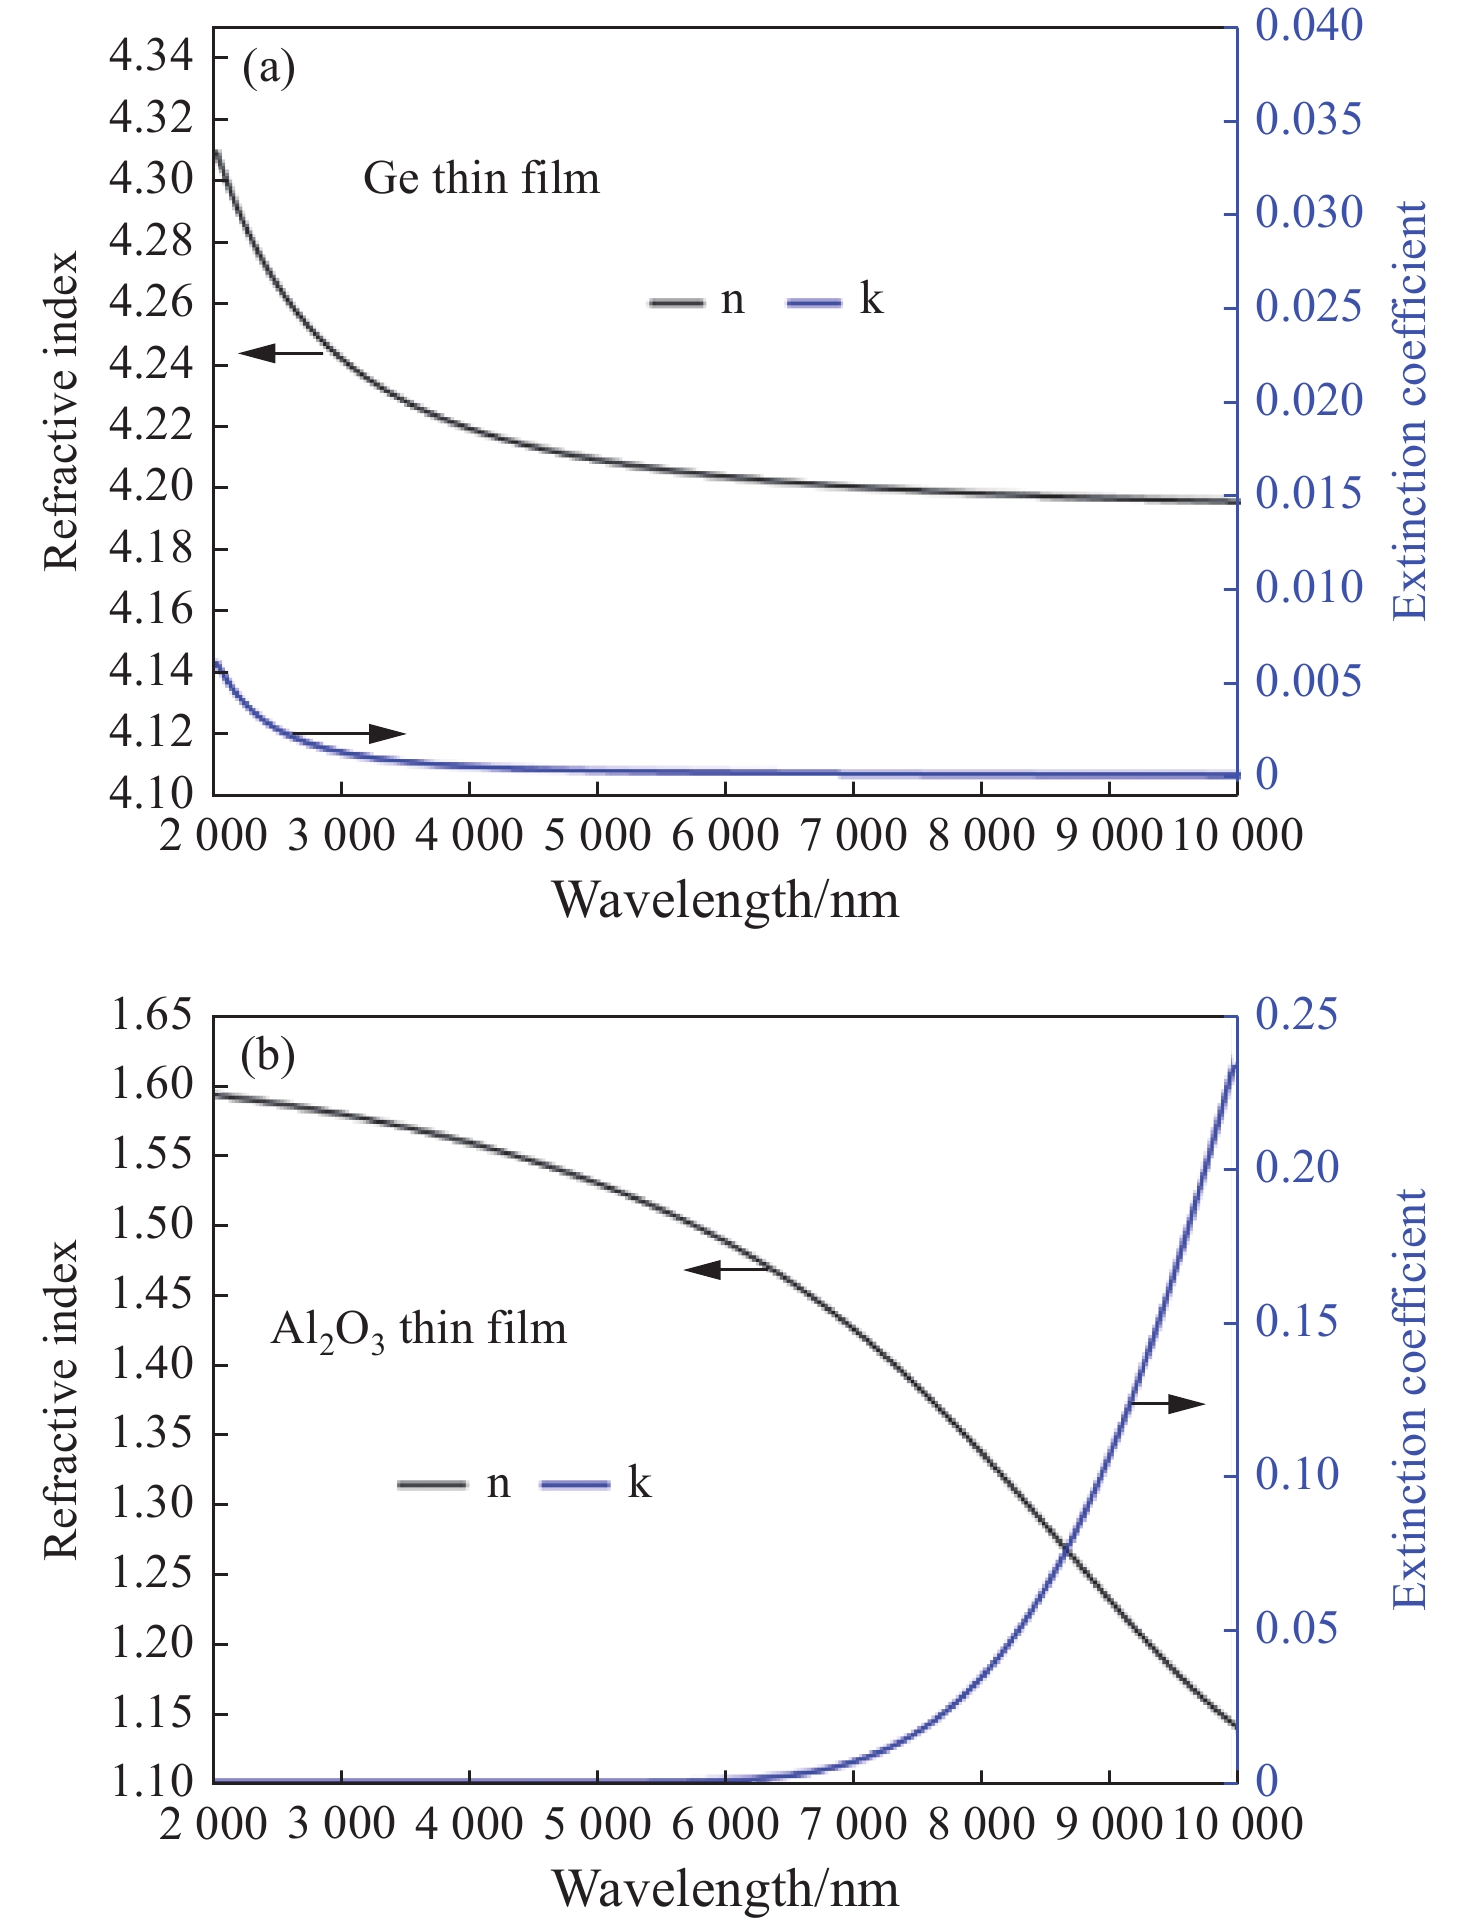
In order to effectively suppress the interference of CO2 radiation 4.3 μm on MWiR target signal with wavelength of 3 μm−5 μm, based on the Needle random intercalation optimization algorithm, an accurate inversion correction model for the growth error of multi-layer ultra-thick Ge/Al2O3 films under quartz crystal monitoring is established by the electron beam evaporation method, thus realizing the design, the accurate inversion and the accurate preparation of MWiR notch filter. In order to solve the problem that the surface profile of the MWiR notch filter changes greatly, the preset substrate surface method is used to realize the low surface profile regulation of MWiR notch filter. The results show that the high refractive index Ge film has good deposition stability with the increase of coating time, while the deposition scale factor of low refractive index Al2O3 thin film changes up to 11.9% in a regular gradual trend. For the prepared MWiR notch filter, the average cut-off transmittance is less than 0.3% in the wavelength range of 4.2 μm−4.5 μm, and the average transmittances are more than 95% in the wavelength range of 3.5 μm−4.05 μm and 4.7 μm−5.0 μm. The surface profile of the substrate after coating can be effectively controlled in a small range. The film has good adaptability to complex environment, and has successfully passed the environmental test of firmness, high temperature, low temperature and damp heat specified in GJB 2485-95.
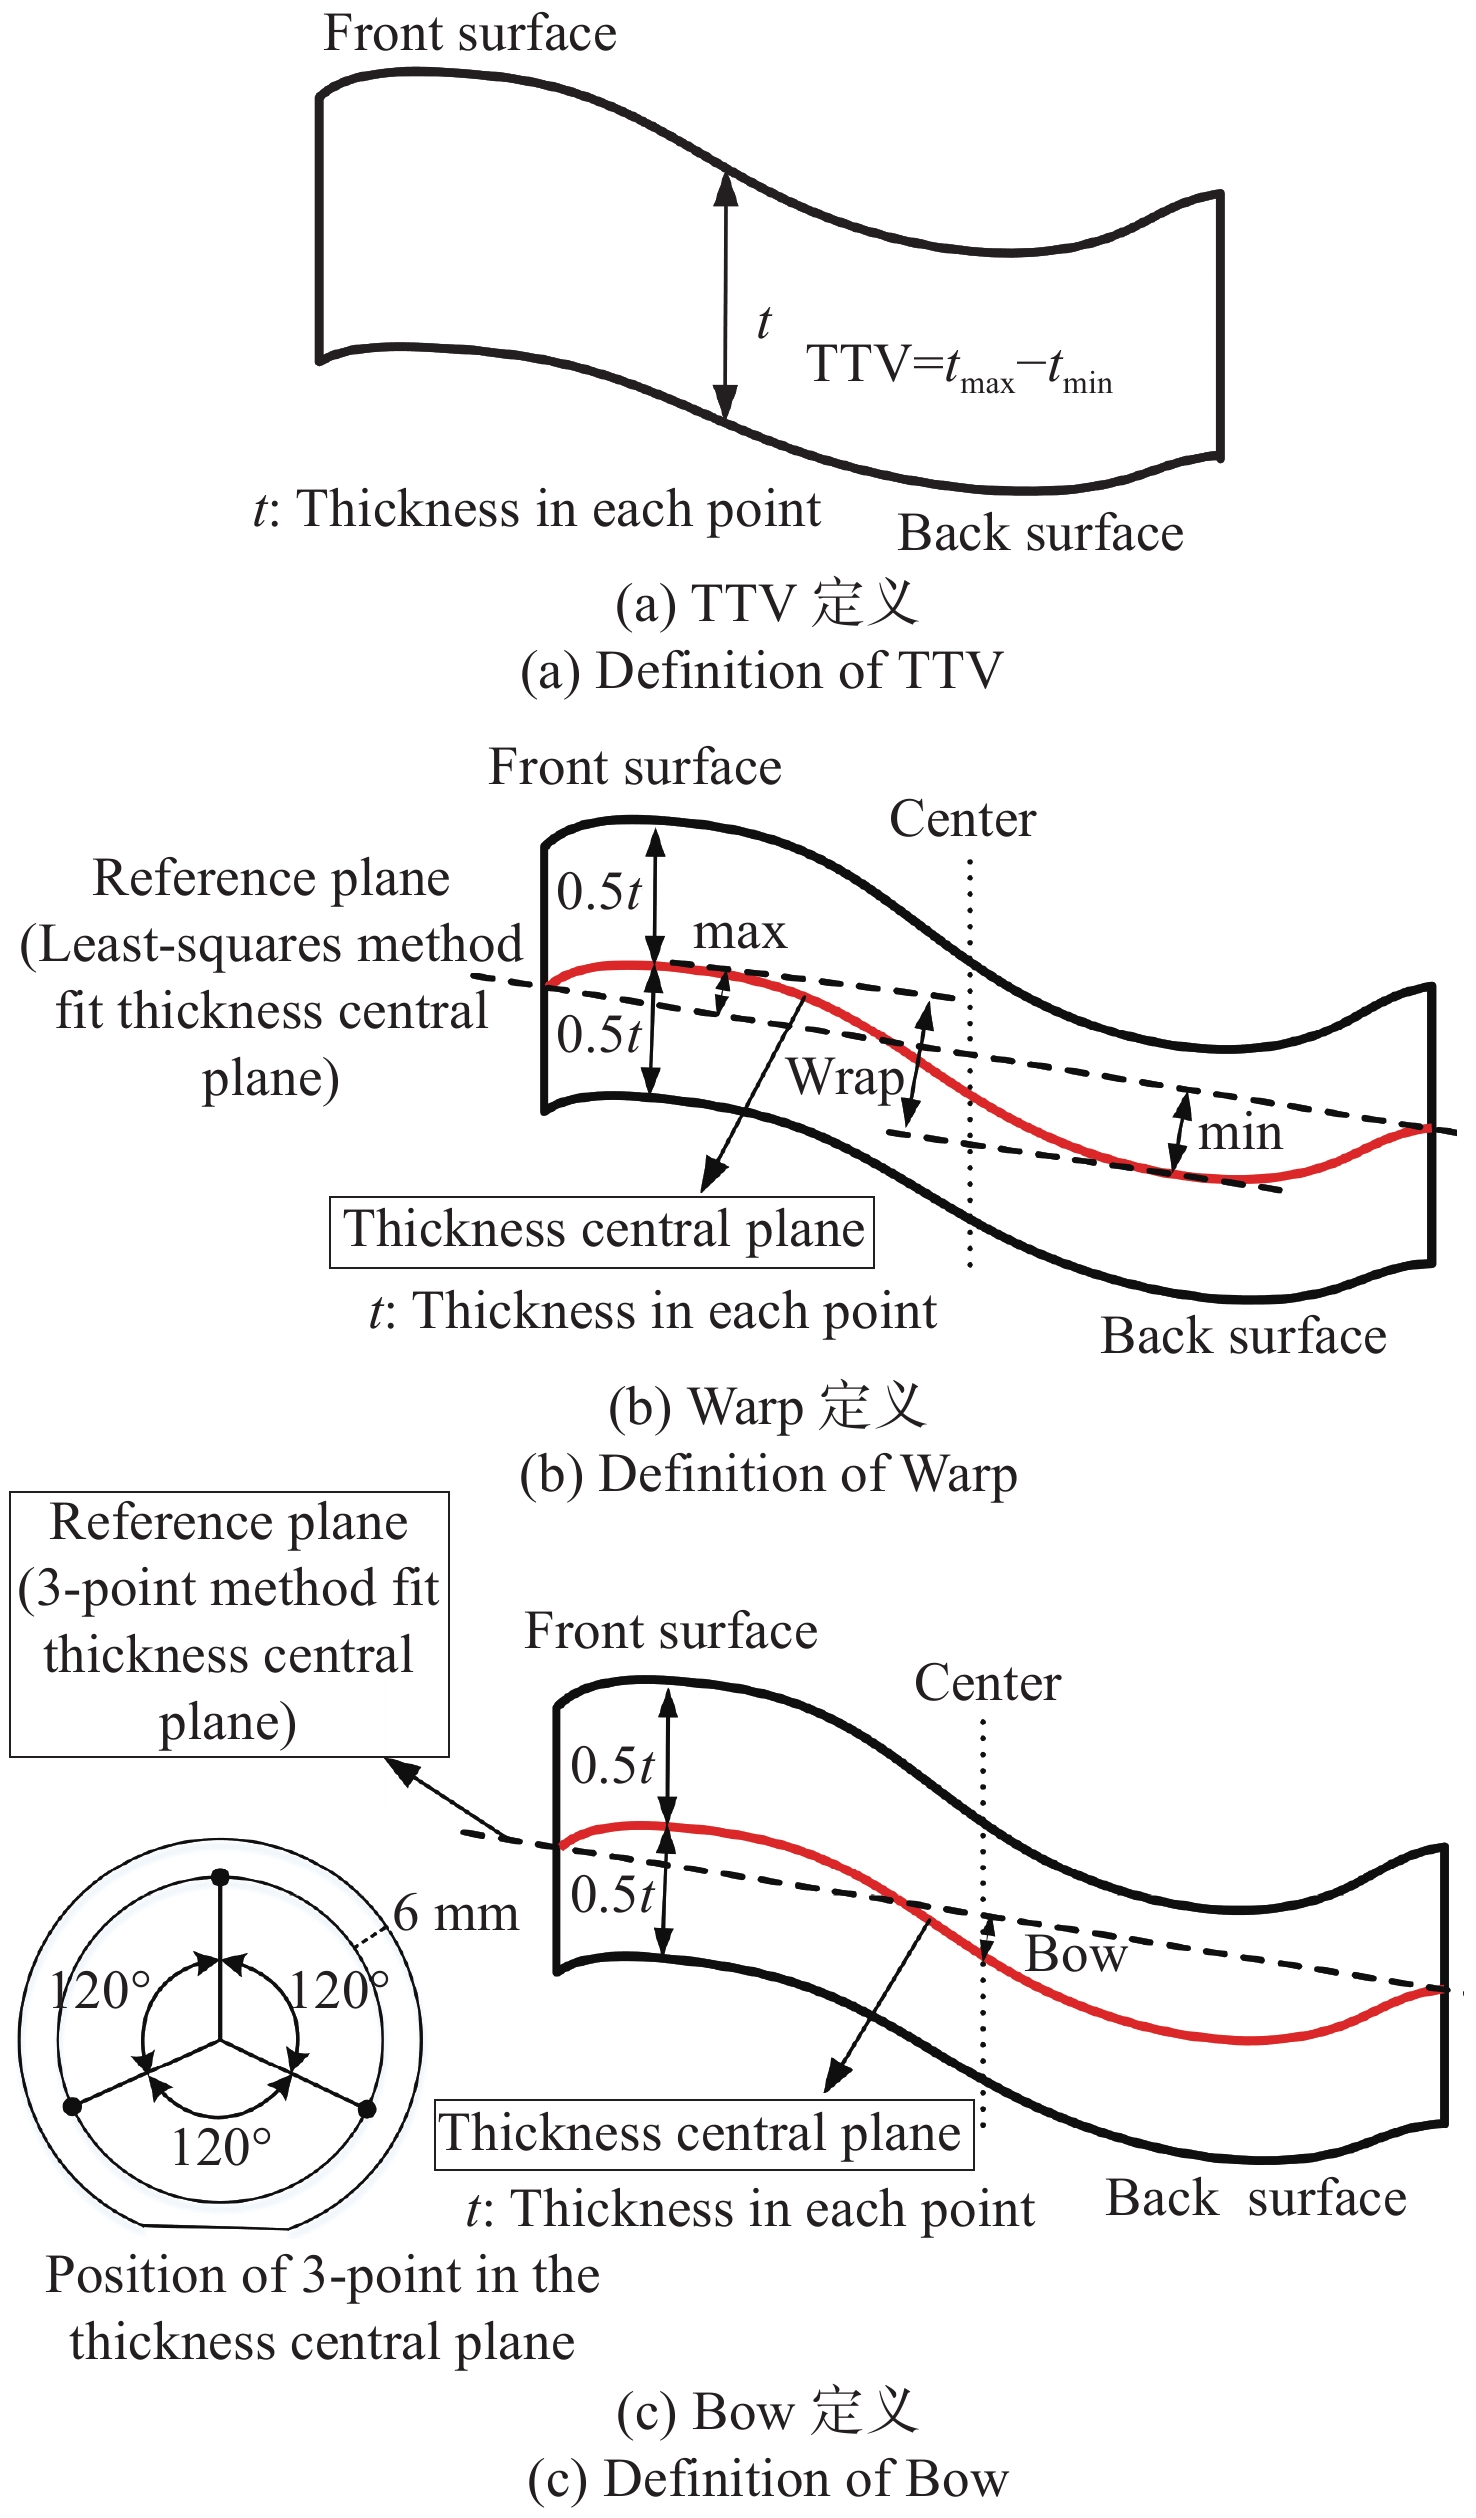
An interferometric measurement method is proposed to measure the Total Thickness Variation (TTV) and the Bow and Warp in the deformation of a double-sided polished wafer. Two phase-shifting Fizeau interferometers with reference mirrors are used to measure the topography of the front and back surfaces of the wafer simultaneously, and the measured topography of the front and back surfaces of the wafer are combined with the cavity topography of the two interferometers when the wafer is not placed to obtain the surface parameters of the double-sided polished wafer which are not affected by the reference mirror error. In the combined operation, the mapping error is introduced because the two reference mirrors are not precisely aligned, which affects the measurement results of the relevant parameters. To this end, before wafer measurement, the three-point positioning device is fixed between the two reference mirrors, and the position of the two reference mirrors is continuously adjusted based on the three-point circular theorem, which can make the mapping error extremely small, thereby reducing the influence of the mapping error on the measurement results. The experimental results show that the mapping errors of 50 mm wafer transverse and longitudinal directions are 21.592 μm and 37.480 μm, respectively, and the TTV, Bow and Warp are 0.198 μm, −0.326 μm and 1.423 μm, respectively. In order to further verify the effectiveness of the adjustment method, a single interferometer was used to flip the wafer for measurement, and the TTV, Bow and Warp of wafer are 0.208 μm, −0.326 μm and 1.415 μm, respectively. The proposed interferometric method can be easily and quickly used for the measurement of large quantities of large-sized wafers after adjusting the position of two reference mirrors, which improves wafer inspection efficiency. At the same time, it has a superior measurement accuracy.
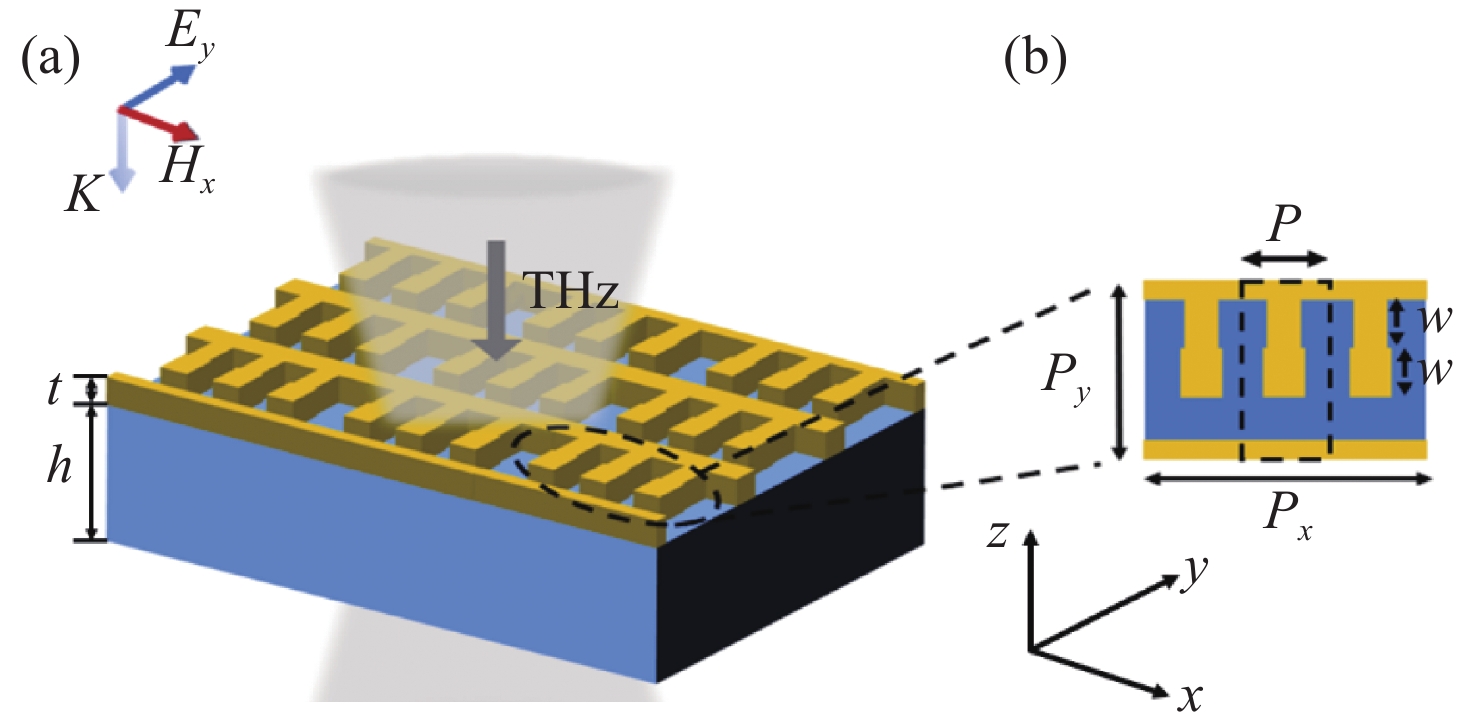
In this paper, the coplanar excitation of terahertz Spoof Surface Plasmon (SSP) realized by using a single-layer grating meta-surface coupling method is proposed, which overcomes the disadvantages such as the reflection measurement when applying the medium couplers. The periodic grating and terahertz SSP composite structure are simultaneously constructed on the monolayer metal structure. When the terahertz waves are incident vertically, the wave vector of grating structures and the wave vector of SSPs are matched, and the SSP mode can be excited. The high
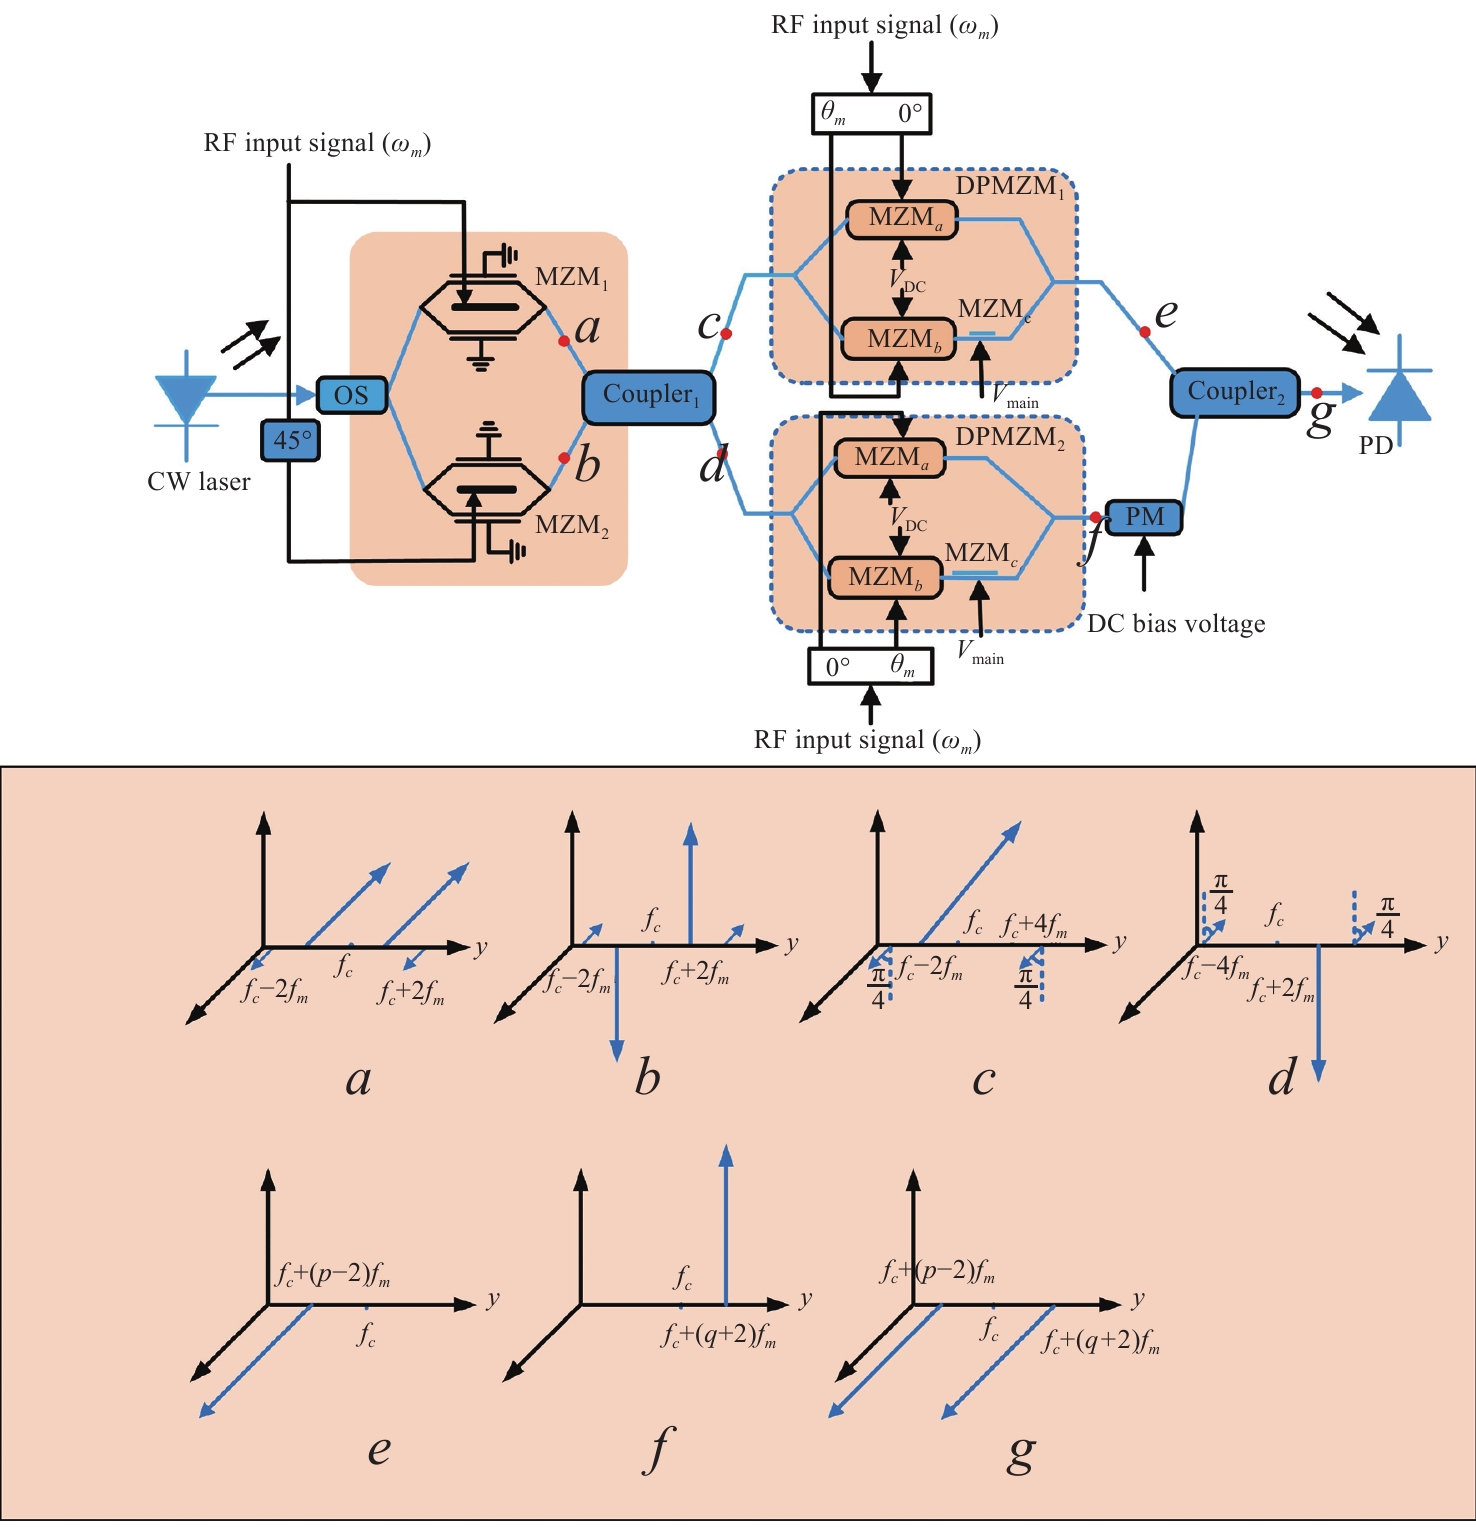
A filterless Microwave Photonic Phase Shifter (MPPS) with a tunable Frequency Multiplication Factor (FMF) and a full 360-deg tunable range is theoretically analyzed and verified by simulation. In the scheme, two parallel Mach-Zehnder Modulators (MZM), cascaded with two Dual-Parallel integrated Mach-Zehnder Modulators (DPMZM) by a 2×2 Optical Coupler (OC), are used to generate the ±1st- to 4th-order sidebands adjustably, and a Phase Modulator (PM) is used to phase shift one of the two lightwaves. After photodetection, the 2nd- to 8th- order harmonics with a continuously tunable phase shift from 0 to 360-deg can be generated by adjusting the RF driving signal and the DC bias voltage of the DPMZM, and the DC voltage of the PM. Simulation results demonstrate that both 360-deg continuously tunable phase shift and frequency multiplication can be implemented. Large Optical Sideband Suppression Ratio (OSSR) and Electrical Spurious Suppression Ratio (ESSR) of around 20 dB can be obtained. The phase shifter wavelength insensitive performance has been also evaluated by simulation.
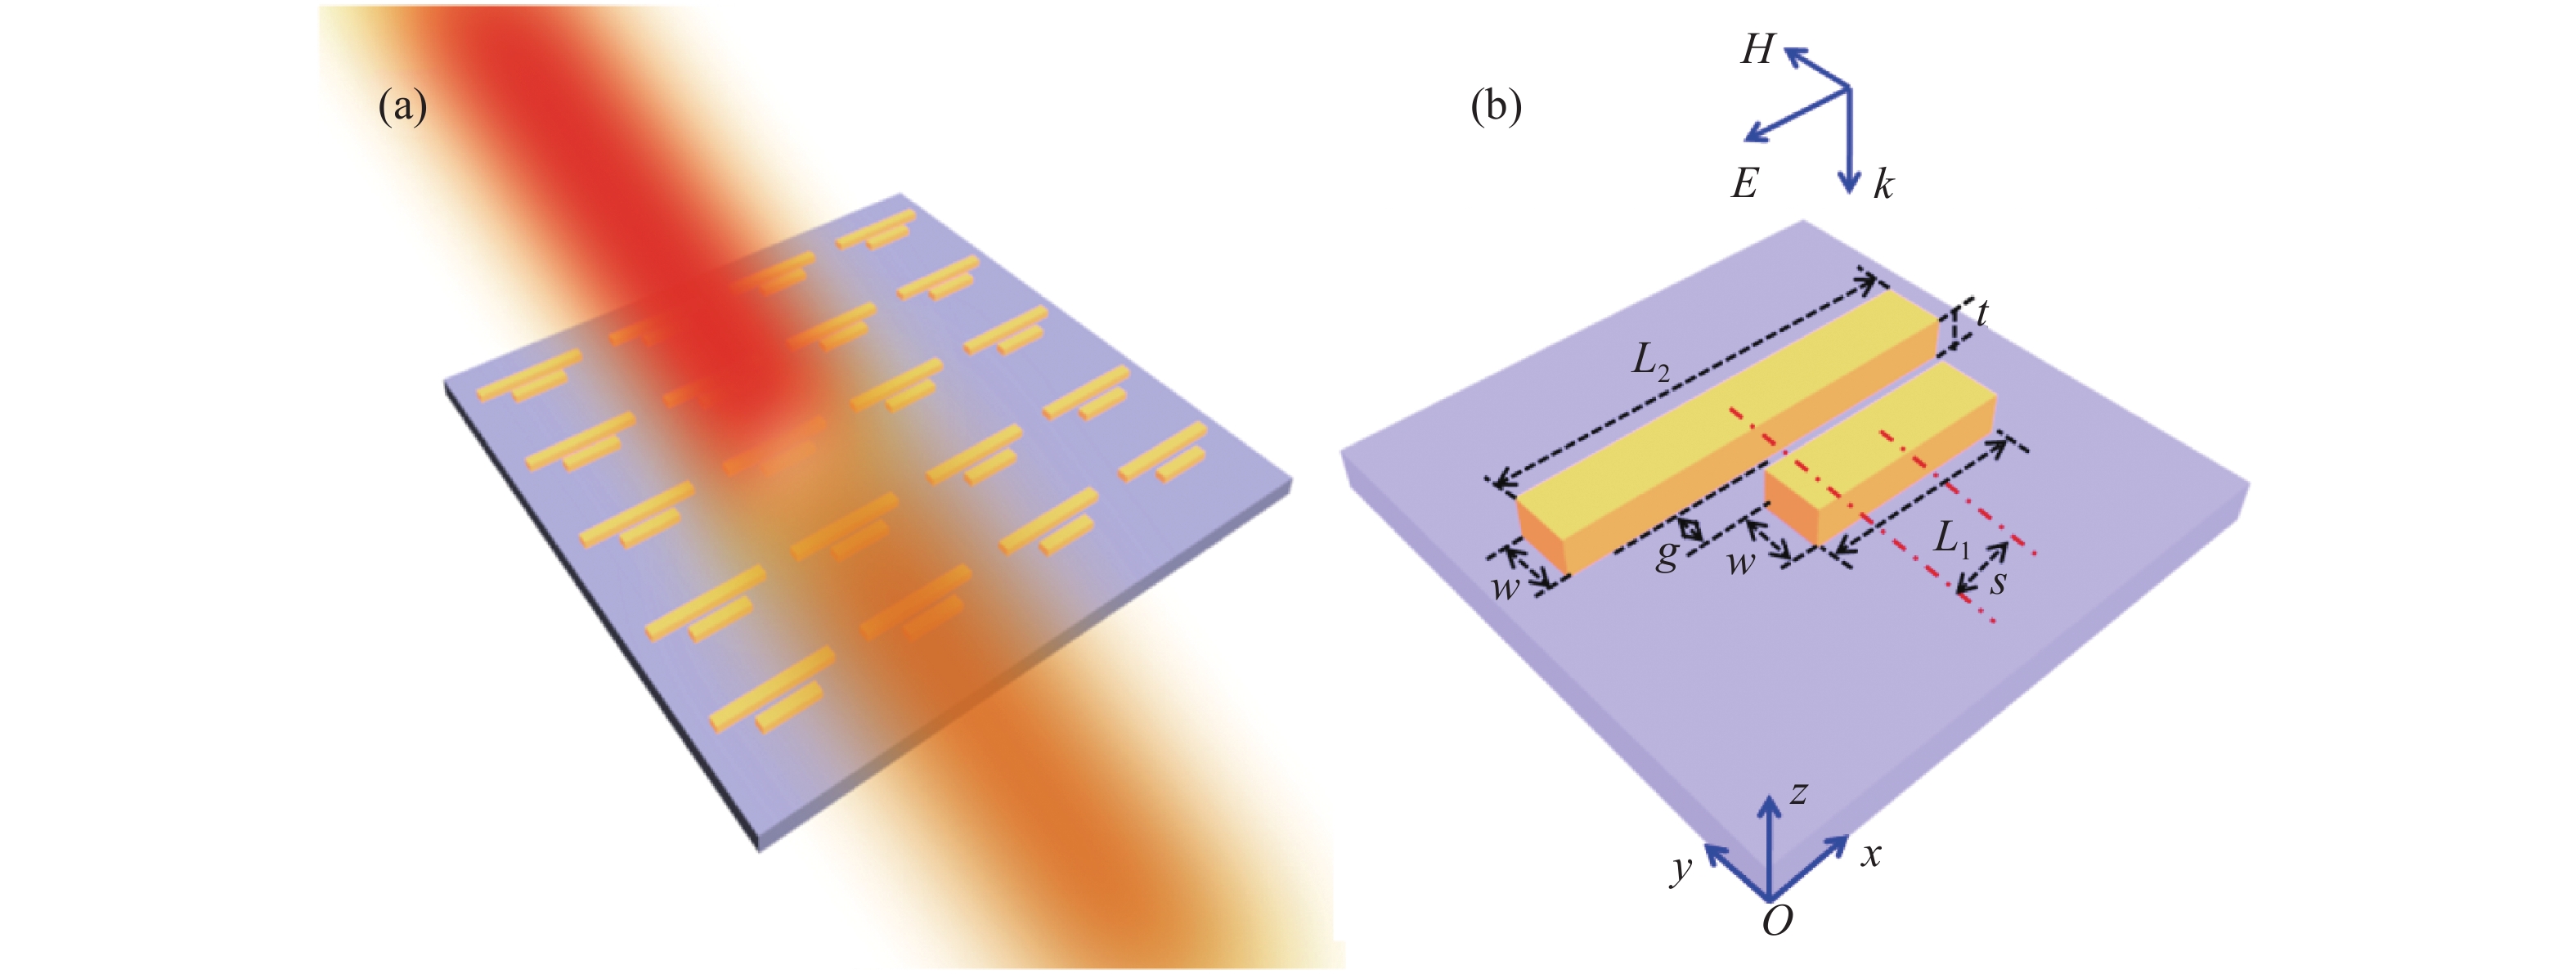
In order to study the coupling and refractive index sensing properties of a metasurface, asymmetric parallel nanorod dimers consisting of two nanorods with different lengths was proposed and designed. In this paper, the finite element method is used to simulate the optical properties and a quasi-static approximation model is used to explain the coupling mechanism of double parallel nanorods. The transmission spectra, electric field at the resonant peak, charge distribution and the influence of structural parameters on the transmission spectra are studied. The electric field distribution is simulated at the resonance wavelength, the electron vibration mode is analyzed, and asymmetric double Fano resonance appears in the transmission spectrum. The results show that the double Fano resonance is generated by the coupling between the nanorods and the substrate, and the double Fano resonance can be regulated by the structural parameters and the refractive index of the surrounding medium. The sensitivity of the refractive index based on the Fano resonance can reach 1.137 μm/RIU. These results provide a theoretical basis for the design of a surface plasmon refractive index sensor.


 Abstract
 FullText HTML
 PDF 11029KB